Pricing a company’s products and services can quickly become a complex process. As offerings grow more diverse, the pricing logic required to account for factors like discounts, delivery costs, and packaging often becomes increasingly intricate. Many businesses turn to Excel for building pricing models because of its flexibility. Excel allows users to adjust data and formulas easily to accommodate changing needs, making it an effective tool for creating and maintaining dynamic pricing systems.
However, Excel is not without its limitations, particularly when used as a distribution tool for pricing models. Challenges such as version control issues, lack of integration, and a high potential for user errors can significantly hamper efficiency and scalability. While Excel excels at flexibility, it falls short when scaling pricing models for end users or integrating them into broader workflows. This creates a need for a solution that preserves the functionality of Excel while eliminating its drawbacks.
This is where SpreadsheetWeb comes in. By transforming Excel pricing models into secure web applications, SpreadsheetWeb empowers businesses to retain control over their pricing logic while offering end users a seamless and reliable experience. The platform eliminates version control issues, reduces user errors, and integrates smoothly into existing systems—all without requiring coding expertise. In this guide, we’ll walk you through the process of turning pricing models in Excel to web apps using SpreadsheetWeb, enabling you to simplify and scale your pricing processes effectively.
Step 1: Identify Inputs and Outputs in Excel
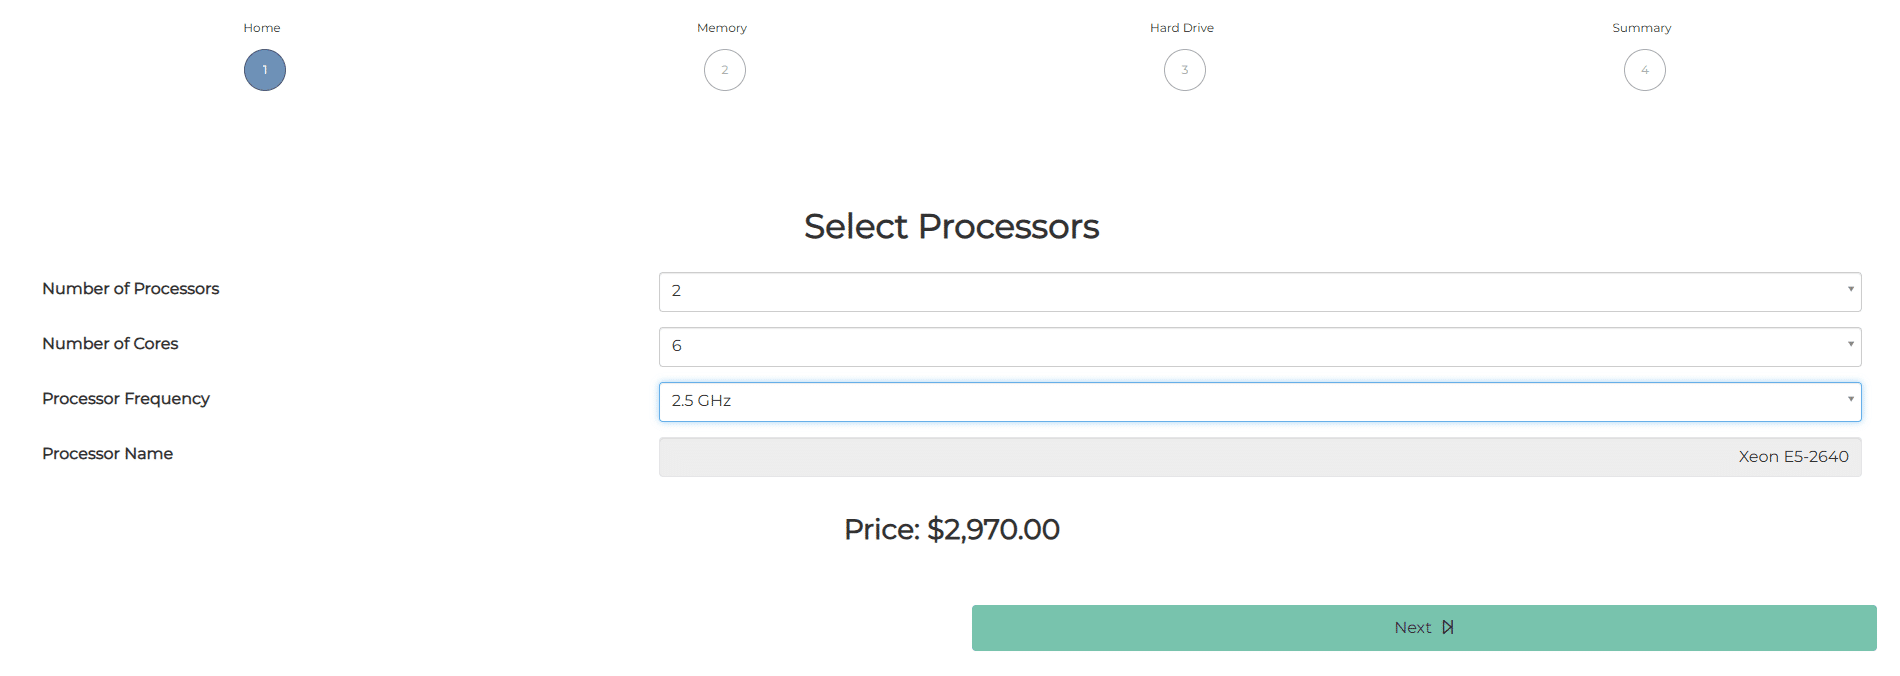
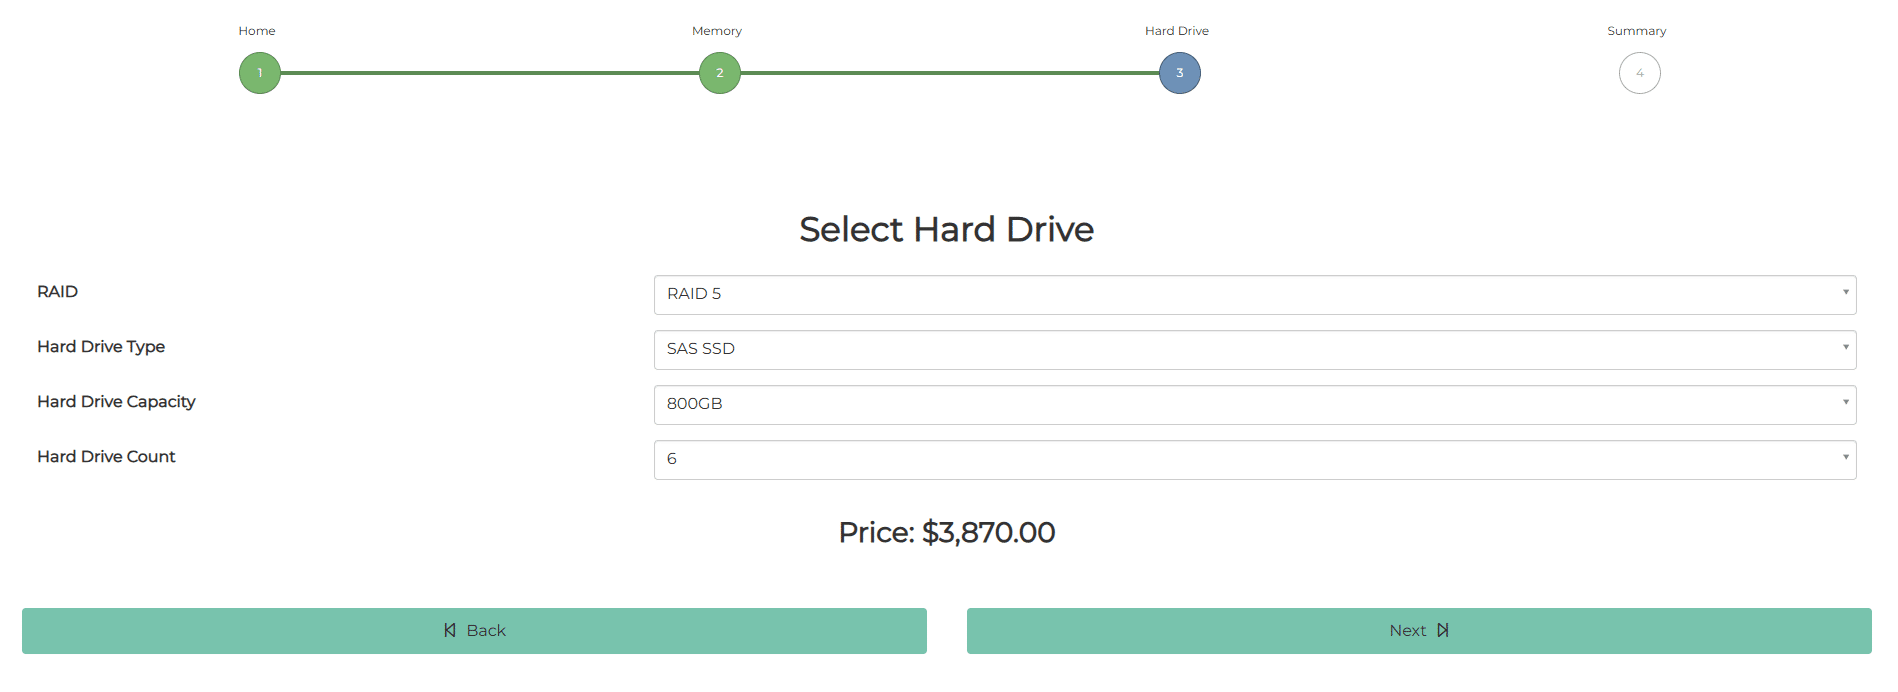
Every Excel model consists of inputs and outputs. Inputs are the cells where you enter data to perform calculations. For example, in a sample Excel file designed to calculate the price of a server, the inputs might include the number of CPUs, the capacity of each CPU, the number and capacity of memory cards, the number of hard disks, and the speed and capacity of each disk. These inputs feed into formulas that reference pricing tables and account for factors such as item compatibility and discount rates. The result of these calculations—such as the total price of the server—is the output of the model. Depending on the complexity of the model, there may be multiple output fields based on various calculations.
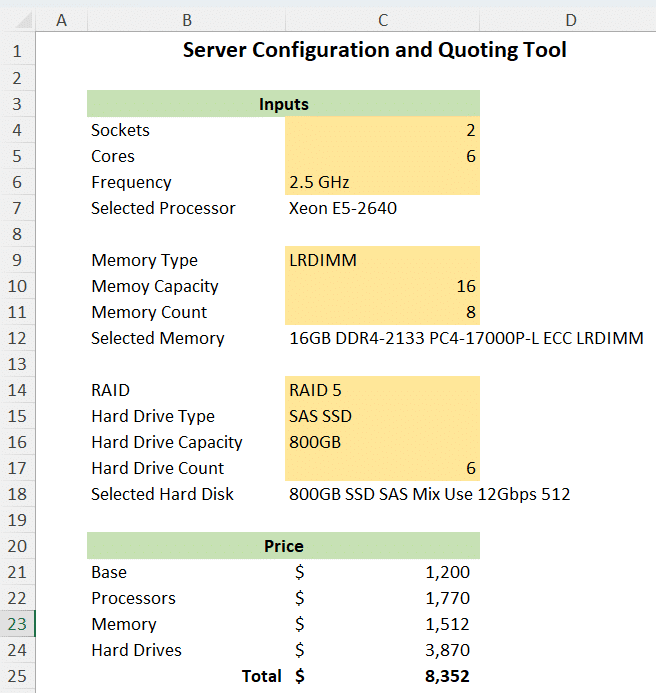
To convert models in Excel to web apps, it’s essential to identify all inputs and outputs that will be exposed in the app’s user interface. Each of these elements should be named for ease of use. Using Named Ranges in Excel is an effective way to organize commonly used cells. For instance, naming a cell "CPUCount" is much clearer and more manageable than referencing it as Sheet2!D24. Named Ranges simplify formula management, make the Excel model easier to maintain, and streamline the process of referencing input and output cells during the app-building phase.
Step 2: Upload the Excel file to SpreadsheetWeb
Assuming you already have an account, log in and select Create New Application. Drag and drop your Excel file into the designated area and click Create. When prompted, choose Application (with UI) as the type of application. The other option, API-based application, is tailored for scenarios where an API is required.

Next, decide how you want to build the application. For most users, the automated application creation tool is the simplest and fastest option. It streamlines the process, allowing you to quickly create a functional app. When prompted, select Try It to proceed. Alternatively, for advanced users seeking full control over the app’s design—such as configuring layouts or choosing specific control types—the manual design option offers greater flexibility.
For straightforward applications with fewer inputs and outputs, the automated tool is ideal. However, if your Excel model involves numerous inputs, outputs, or multiple pages, the manual design option may be better suited to accommodate your needs. Choose the approach that best fits your project requirements.
Step 3: Enable Database to Store User-Submitted Data (Optional)
Once the user interface is created, either through automated application creation or manual design, the next step is to optionally add a database to store user-submitted data. This step is not mandatory. For instance, if you are building an online calculator, storing user data may not be necessary. However, for a pricing application designed for your sales team, storing user inputs can be highly beneficial, particularly if the application involves numerous input fields.
By enabling the database feature, user-submitted data—such as specific customer quotes—can be saved within the application, allowing you to revisit and manage this information later. This feature is especially useful for applications that generate detailed outputs requiring future reference.
SpreadsheetWeb provides a built-in interface where users can easily manage their saved data entries. This interface allows users to view a list of previously created quotes, as well as edit, copy, or delete them as needed. With functionality similar to a typical sales system, this feature enhances usability and ensures efficient management of user-submitted sales quotes within the application.
Step 4: Add Events (Optional)
SpreadsheetWeb offers a variety of events that you can incorporate into your web app to enhance its functionality. These events are typically triggered by button clicks within the application’s user interface. Examples include generating a PDF document based on user data and calculation results or sending an email to a preconfigured address or one entered by the user.
In addition to predefined events, you can create custom events using JavaScript. These custom events can be embedded directly into the application and triggered with a button click, providing advanced functionality tailored to your specific needs.
Step 5: Apply a Stylesheet to the Application (Optional)
Stylesheets allow you to customize the visual appearance and formatting of your application, giving it a polished and professional look. With stylesheets, you can control aspects such as fonts, colors, spacing, and overall layout to match your branding or design preferences.

SpreadsheetWeb provides a selection of preset stylesheets that you can easily apply to your application, making it simple to enhance its look without requiring design expertise. These pre-built options cover a range of common design needs, ensuring your application appears visually appealing right out of the box.
For those seeking more control or a unique design, SpreadsheetWeb also supports custom stylesheets. By writing your own CSS, you can tailor the application's appearance to fit specific branding guidelines or create a completely customized user experience. While applying stylesheets is optional, it can significantly improve the user interface and make your application more engaging for end users.
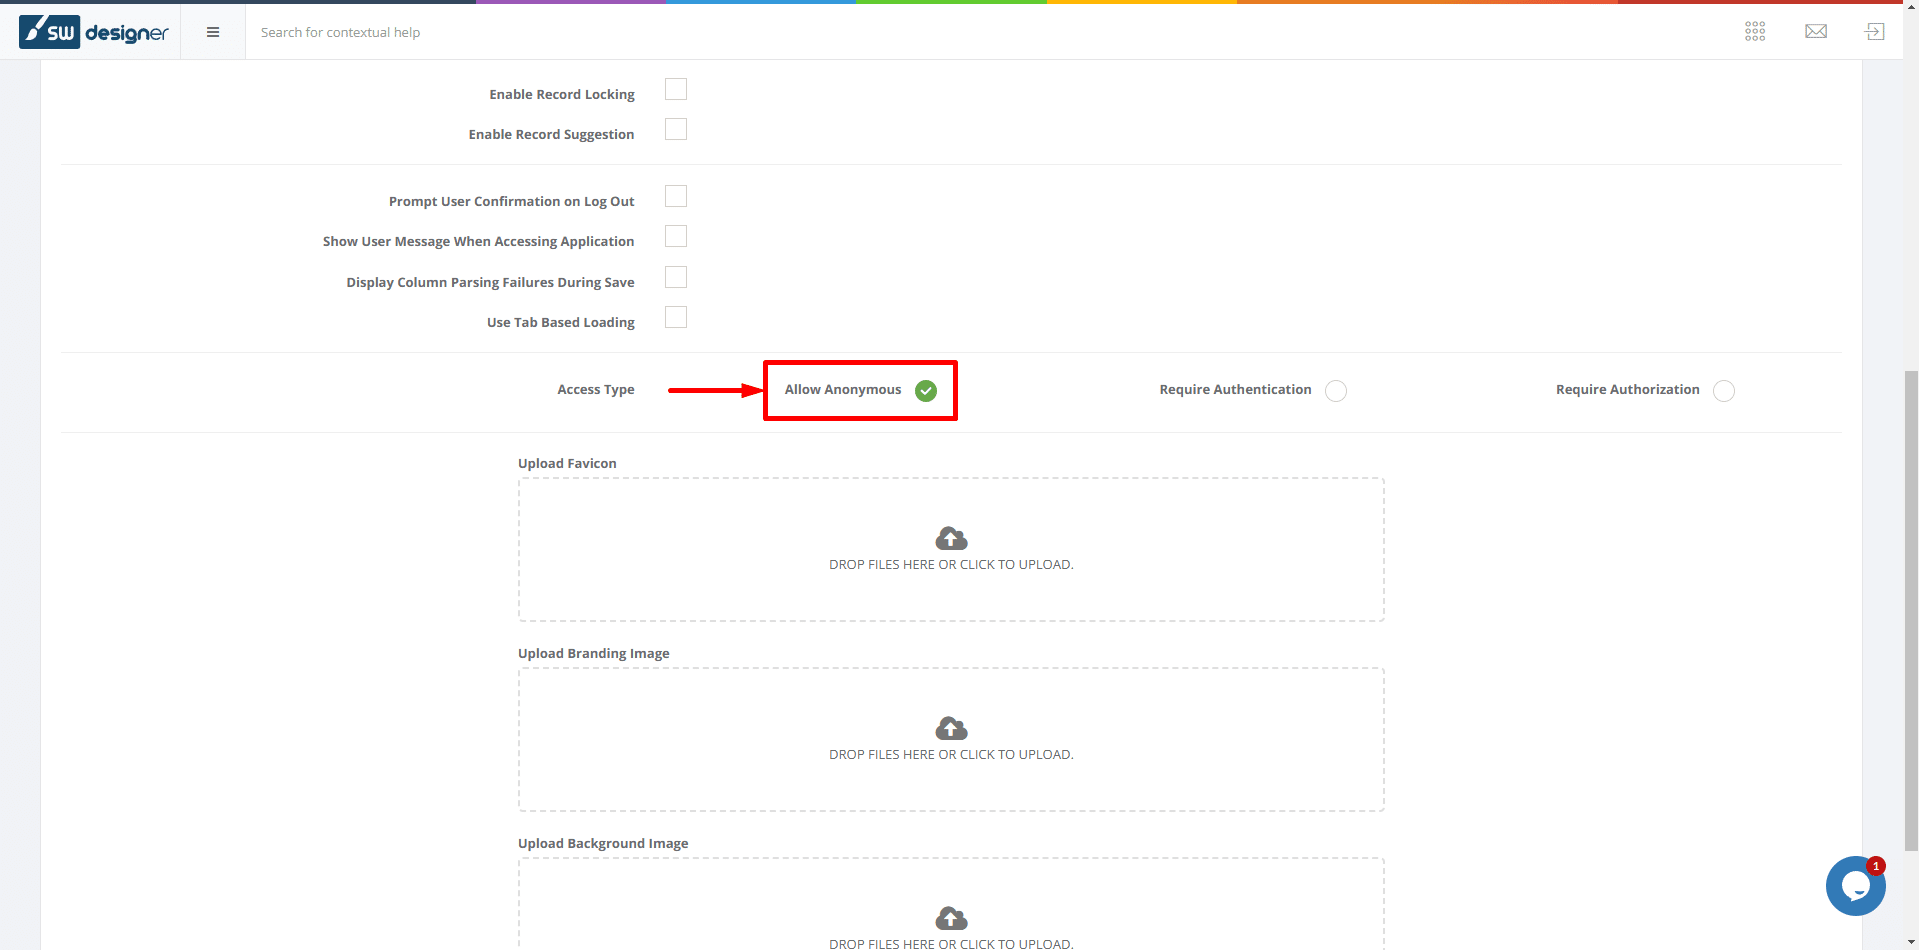
Step 6: Configure Access Type (Optional)
The access type defines how users can interact with your application. By default, the access type is set to Allow Anonymous, which means anyone with the application link can access it. This setting is ideal for public-facing applications where unrestricted access is desired.
For sensitive applications where you want to control who can access the tool, you can change the access type to Require Authorization. With this setting, users attempting to access the application will be prompted to log in. Only registered users will be granted access, ensuring your application is secure and accessible to authorized individuals only.
SpreadsheetWeb’s User Module allows you to manage user access privileges effectively. You can also configure the system to send invitation emails, enabling users to register for access seamlessly. This feature provides flexibility and security, ensuring your application is accessible only to the intended audience when converting Excel to web apps.
Step 7: Publish and Distribute Your Application
The final step is to publish your application once you’ve completed its design. Upon publishing, the system will generate a unique URL that you can share with your users or integrate into your website. Additionally, you have the option to embed the application link within an iframe on your website for seamless access.
If you choose to embed the application in an iframe, ensure that the access type is set to Allow Anonymous, as most browsers do not support iframes with login pages.
Conclusion
Transforming pricing models in Excel to web apps with SpreadsheetWeb is a powerful way to simplify complex processes, enhance user experience, and scale your business operations. By leveraging the platform’s intuitive tools, you can overcome the limitations of Excel, such as version control issues, lack of integration, and user errors, while retaining full control over your pricing logic.
This step-by-step guide has shown how to identify inputs and outputs, upload your Excel file, and customize your application with features like databases, events, stylesheets, and access controls. Whether you’re building a simple online calculator or a comprehensive pricing tool for your sales team, SpreadsheetWeb provides the flexibility and functionality needed to create professional-grade web apps—all without requiring coding expertise.

