In this detailed guide, we will walk you through the process of integrating the SpreadsheetWeb API to embed complex Excel calculations into your Tadabase application. Tadabase, a no-code platform for building data-driven applications, allows for API integration through its built-in API connectors and custom code features.
By the end of this guide, you will have a fully functional Tadabase application that sends data from a form to the SpreadsheetWeb API, processes Excel calculations, and displays the output back in Tadabase.
To Begin with: Transforming Your Excel File into an API with SpreadsheetWeb
Before getting into the technical details of integrating the SpreadsheetWeb API with Tadabase, it’s important to introduce the example Excel file that will be utilized. This file is crucial, as it contains the inputs and calculations that the API will use. The example Excel file includes two individual input cells (Input1, Input2) and one tabular input field (Table1). It also contains two output cells (Output1, Output2) and one tabular output element (Table2), which generate results based on the input values using formulas, much like a typical Excel calculator.
To begin using the SpreadsheetWeb API, you first need to upload your Excel file to the SpreadsheetWeb Hub, where you will create an application. This process converts your spreadsheet into an API that can be accessed programmatically.
API Setup Overview
Even though this guide focuses on integrating with Tadabase, it’s important to note that creating an API from your SpreadsheetWeb application provides key details necessary for configuring the API within Tadabase. These details include:
- API Endpoint URL
- Workspace ID
- Application ID
- Authentication settings (if applicable)
These pieces of information will be used to establish the connection between Tadabase and the SpreadsheetWeb API. For more detailed instructions on creating an API from a SpreadsheetWeb application, you can refer to the step-by-step guide in our documentation.
SpreadsheetWeb API Authentication Options
The SpreadsheetWeb API offers two options for your API calls, including:
- Token-Based Authentication: The most secure option, which involves sending a Bearer token in the request headers to authenticate and authorize API requests.
- No Authentication: This is a simpler option, often used during development or for cases where authentication isn’t required. It’s helpful when testing internally or when less security is acceptable.
For simplicity, we will proceed with no authentication in this guide. This approach allows for a more straightforward setup in Tadabase without the need to configure authorization headers. However, if your use case requires additional security, you can enable token-based authentication in SpreadsheetWeb. In such cases, you’ll need to set up Tadabase to send the Bearer token in the Authorization header for API calls.
Using no authentication simplifies the initial setup, but we strongly recommend enabling token-based authentication for production applications to safeguard your API from unauthorized access.
Overview of the API Call Structure
The following is an example of the API request structure that we will use to send data to SpreadsheetWeb from Tadabase:
{
    "workspaceId": "workspace-id-sample",
    "applicationId": "application-id-sample",
    "inputs": {
        "Input1": "<Input1>",
        "Input2": "<Input2>",
        "Table1": "<Table1>"
    },
    "outputs": ["Output1", "Output2", "Table2"]
}
In this integration:
- Inputs are collected from user input fields in Tadabase.
- Outputs are processed by SpreadsheetWeb and will be displayed back in Tadabase.
Step 1: Configuring the SpreadsheetWeb API in Tadabase
The first step is to configure the API settings in Tadabase so it can communicate with the SpreadsheetWeb API and handle input/output data.
1.1 Setting Up API Keys and Authentication
- Open Tadabase and Access the API Settings:
- Log in to your Tadabase account and navigate to the Settings tab of your application.
- Go to Data Sources and select External API. Here you will configure the connection between Tadabase and SpreadsheetWeb.
- Configure OAuth Authentication (Optional):
- If the API requires OAuth 2.0 authentication (as in the case of SpreadsheetWeb), you will need to set up the client credentials:
- Client ID: Use the client_id provided by SpreadsheetWeb.
- Client Secret: Use the client_secret provided by SpreadsheetWeb.
- Add the Authorization URL: https://hub.spreadsheetweb.com/identity/connect/token.
- If the API requires OAuth 2.0 authentication (as in the case of SpreadsheetWeb), you will need to set up the client credentials:
- Save API Authentication: Once the authentication settings are configured, Tadabase will store the OAuth tokens and refresh them as needed to maintain the API connection.

1.2 Adding a New API Call in Tadabase
Now that the API is authenticated, you need to configure the actual API call.
- Go to API Calls:
- Navigate to the API Calls section within Tadabase and click Add New API Call.
- Set the API Method and Endpoint:
- Method: POST (since we are sending data to the API).
- API Endpoint: https://api.spreadsheetweb.com/calculations/calculatesinglesimple.
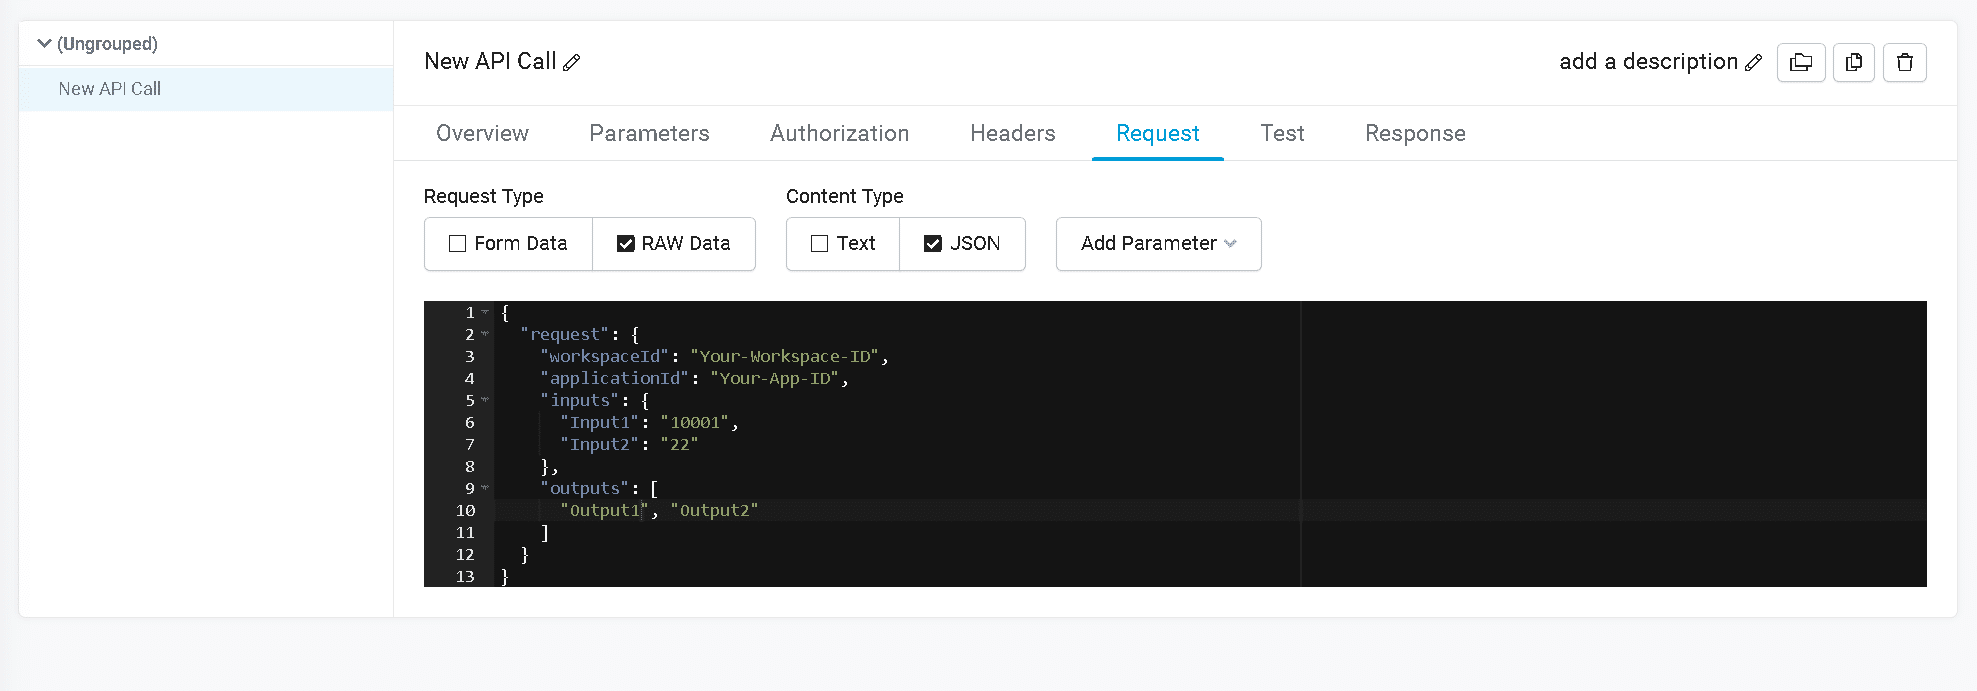
- Define the Request Body: You will now define the structure of the request body that Tadabase will send to the SpreadsheetWeb API. Here's an example structure:
{
    "workspaceId": "your-workspace-id",
    "applicationId": "your-application-id",
    "inputs": {
        "Input1": "{Input1}",
        "Input2": "{Input2}",
        "Table1": "{Table1}"
    },
    "outputs": ["Output1", "Output2", "Table2"]
}
{Input1}, {Input2}, and {Table1} are placeholders that will dynamically be replaced with the user’s input from Tadabase forms.
- Add Headers to the API Call: In the API request, you will need to define the headers required by the API:
- Content-Type: application/json
- Authorization: Bearer {oauth_token} (if using OAuth authentication).
- Test the API Call: Use Tadabase’s built-in test feature to send a sample request and verify that the API responds correctly. Ensure that the expected outputs (Output1, Output2, and Table2) are returned by the SpreadsheetWeb API.


Step 2: Building the User Interface in Tadabase
Once the API connection is established, we will create a user interface in Tadabase that allows users to input data, trigger the API call, and display the results.
2.1 Creating Forms to Collect Input
- Create a New Form in Tadabase:
- In the Pages section of Tadabase, create a new form that will collect the user inputs (Input1, Input2, Table1).
- Add input fields such as Text Inputs or Table Inputs to capture the data dynamically.
- Bind the Form to the API Call:
- Once the form is ready, bind it to the previously configured API call.
- Map the form fields to the corresponding placeholders in the API request body:
- Map Input1 to the user’s first input.
- Map Input2 to the second input.
- Map Table1 to a multiline or tabular input field.

2.2 Adding a Button to Trigger the API Call
- Create a Custom Button: Add a button in the form to submit the data to the API. This button will trigger the API call to SpreadsheetWeb and send the data that the user entered in the form.
- Configure the Button to Call the API: In the button’s action settings, specify that the button should execute the API call when clicked. Tadabase will automatically send the form data as part of the API request.

Step 3: Displaying API Results in Tadabase
Once the API call is complete, the next step is to display the results in Tadabase. The API will return the outputs, which may include single values (Output1, Output2) and tabular data (Table2).
3.1 Creating Output Fields
To display the results from the API call, you’ll need to configure the output fields within Tadabase. The image above illustrates how you can set this up:
- Access the API Call Section: Navigate to the API Calls section and select the desired API call configuration.
- Define Output Keys: Within the Response tab, create new responses by defining the API output keys. In the example from the image:
- Two output keys have been defined:
response.outputs.Output1andresponse.outputs.Output2. These correspond to the fields in your Excel application that will return processed results. - For each output key, assign a corresponding Field Name. This is the label that will be used to reference the data when displayed in Tadabase. For example:
response.outputs.Output1is mapped to Output1.response.outputs.Output2is mapped to Output2.
- Two output keys have been defined:
- Set the Data Type:
- Ensure that the Data Type is set to String for each output. This format is suitable for single-value outputs from the SpreadsheetWeb API. If dealing with numeric or other types of data, adjust the type accordingly.
- Add Additional Responses:
- You can add multiple output keys by clicking on Add New Response. This allows you to map additional fields from the SpreadsheetWeb response, such as tabular data or further single-cell outputs.
Once these steps are complete, the API call will return the specified output fields, which you can then bind to your Tadabase user interface elements. These output values, once received from the API, will be dynamically displayed to users on the front end.
Conclusion
By following this guide, you have successfully integrated the SpreadsheetWeb API into Tadabase. You can now send user input from a Tadabase form to the API, process it through SpreadsheetWeb, and display the results back in your application.
This setup allows you to leverage powerful spreadsheet-like calculations in a modern web application environment without having to code complex backend logic. Tadabase’s no-code platform combined with SpreadsheetWeb’s API provides a flexible, scalable solution for building data-driven applications.
For further improvements, consider adding more advanced workflows, using Tadabase’s automation features, or integrating additional APIs to enhance the functionality of your application.