In this article, we’ll walk through the steps required to integrate Excel calculations into Airtable by utilizing the SpreadsheetWeb API. This process enables you to dynamically input values from Airtable forms, make API calls to calculate specific outputs, and automatically update Airtable records based on the response.
To Begin with: Transforming Your Excel File into an API with SpreadsheetWeb
Before diving into the technical details of integrating the SpreadsheetWeb API with Airtable, it’s essential to understand the core component: your Excel file. This file forms the foundation of your API, as it contains the input fields, calculations, and output results that the API will use.
For the purpose of this guide, let’s assume you have an Excel file with the following structure:
- Three individual input fields: (originZIP, destinationZIP, weight).
- An output field: (cost), which is generated based on the input values through pre-configured Excel formulas.
This Excel file operates like a typical Excel calculator, but once converted into an API, it allows you to programmatically submit inputs and retrieve calculated results—just as if you were using the spreadsheet manually.

Uploading Your Excel File to SpreadsheetWeb Hub
To convert your Excel file into an API, you’ll first need to upload it to the SpreadsheetWeb Hub. The Hub allows you to create an application from your Excel file, turning it into a web-based API. This process transforms your Excel formulas and calculations into a format that can be accessed programmatically via API calls.
Once uploaded, you will be provided with essential details that are critical for making API requests from Airtable. These include:
- API Endpoint URL: The unique URL where API requests will be sent.
- Workspace ID: The identifier for your workspace within SpreadsheetWeb.
- Application ID: The specific ID of your application that corresponds to your Excel file.
- Authentication settings (if applicable): Whether your API requires token-based authentication or not.
These details will be crucial when you configure the script within Airtable to interact with the API.
For a detailed guide on creating an API from a SpreadsheetWeb application, please refer to the documentation provided by SpreadsheetWeb. This resource will walk you through each step of the process, ensuring your Excel file is successfully converted into an API.
SpreadsheetWeb API Authentication Options
When setting up the API, you have two main authentication options:
- Token-Based Authentication: This is the more secure option. It requires sending a Bearer token in the request headers to authenticate and authorize the API calls. This method ensures that only authorized users can access the API.
- No Authentication: This is a simpler option, often used during the development phase or for internal testing where security is not a primary concern.
For the purposes of this guide, we will use the No Authentication option to keep the setup simple while integrating with Airtable. By skipping authentication, you won’t need to configure authorization headers, simplifying the process. However, for production environments, we strongly recommend enabling token-based authentication to protect your API from unauthorized access.
If your use case requires additional security, you can enable token-based authentication through SpreadsheetWeb. When using this option, you would need to configure Airtable to include the Bearer token in the headers of the API request, ensuring that your API calls are authenticated.
Step 1: Creating a New Application in Airtable
To begin, head over to your Airtable workspace and create a new application. When setting up the new application, select the “Build from Scratch” option to customize the process according to our requirements.
Once your application is open, the first step is to create a Data Table. This will act as the central storage for the input values and the calculated output.
- Navigate to the Data section in the top menu and create a new table.
- Define the columns (fields) according to the API inputs and outputs. For our case, we will use:
- originZIP (input)
- destinationZIP (input)
- weight (input)
- cost (output)

Note: Make sure that all columns are set to Single Text Line to avoid any formatting issues when sending API requests.
Step 2: Creating a Form for Data Input
Now that we have a data table ready, we need to create a form that users can interact with to input the required data.
- Navigate to the Form section from the top menu.
- Link the form to the table you created by selecting the table.
- In the form editor, add the originZIP, destinationZIP, and weight fields, as these will be our input fields.

Once the form is set up, publish it so that users can begin submitting their data.
Step 3: Automating the API Call
Now that we have a data table and a form, we will automate the process of sending the form data to the SpreadsheetWeb API and updating the Airtable records with the calculated cost.
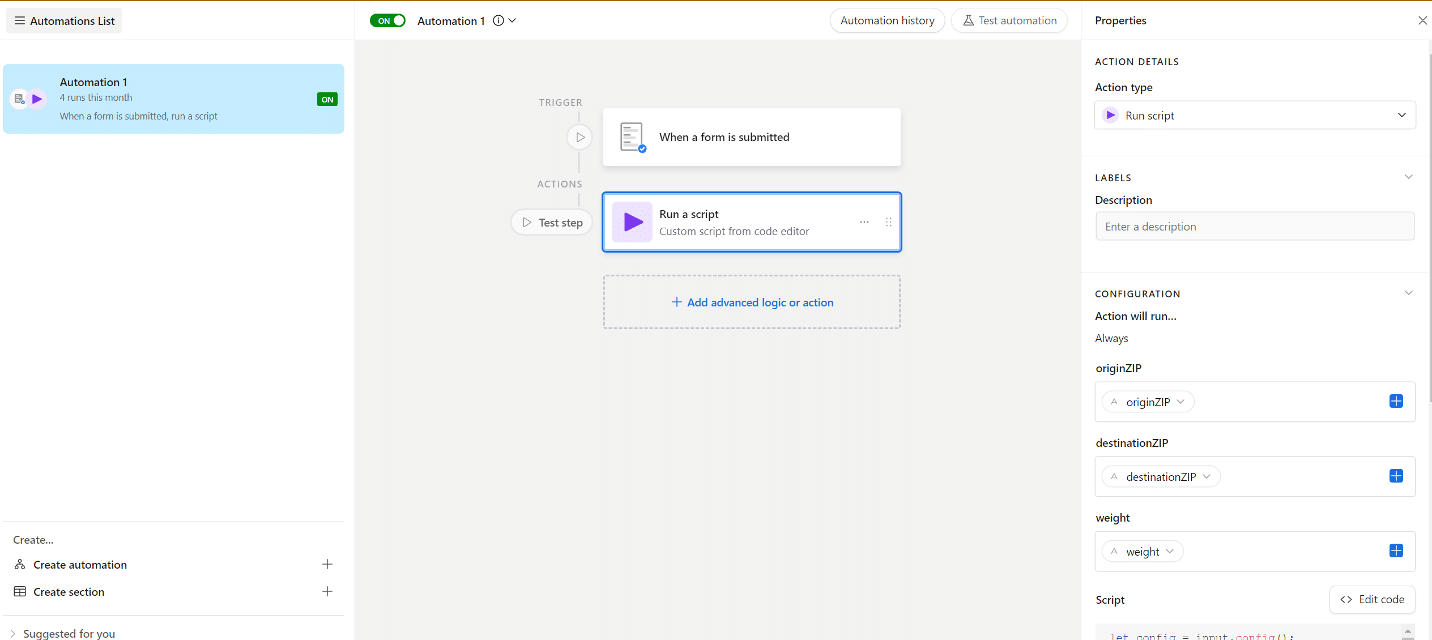
- Navigate to the Automation section.
- Create a new automation with the following steps:
- Trigger: Set the trigger to “When a Form is Submitted”. This ensures that the API call is only made when the user submits the form.
- Action: Add a Run Script action to handle the API call.

Step 4: Writing the API Call Script
Below is the script that will handle fetching the “cost” from the SpreadsheetWeb API based on the input values and updating the corresponding Airtable record.
let config = input.config();


// Extracting the input values from the form submission

let originZIP = config.originZIP || '';

let destinationZIP = config.destinationZIP || '';

let weight = config.weight || '';


// Validating that all inputs are filled

if (!originZIP || !destinationZIP || !weight) {

throw new Error('All input fields must be filled!');

}


// Accessing the table where the form data is stored

let table = base.getTable('Table 1');


// Searching for the record that matches the submitted inputs

let queryResult = await table.selectRecordsAsync();

let recordToUpdate = queryResult.records.find(record =>

record.getCellValue('originZIP') === originZIP &&

record.getCellValue('destinationZIP') === destinationZIP &&

record.getCellValue('weight') === weight

);


// If no matching record is found, throw an error

if (!recordToUpdate) {

throw new Error('No matching record found for the provided inputs!');

}


// Extracting the record ID to update later

let recordId = recordToUpdate.id;

console.log('Record ID:', recordId);


// Making the API call to SpreadsheetWeb to calculate the cost

let response = await fetch('https://api.spreadsheetweb.com/calculations/calculatesinglesimple', {

method: 'POST',

headers: {

'Content-Type': 'application/json'

},

body: JSON.stringify({

"request": {

"workspaceId": "3bae377c-12fb-4b5e-90d2-a29aa12a6d79",

"applicationId": "f8da5ff3-26dd-473c-9331-e43322e923ed",

"inputs": {

"originZIP": originZIP,

"destinationZIP": destinationZIP,

"weight": weight

},

"outputs": [

"cost"

]

}

})

});


// Parsing the API response

let data = await response.json();

let cost = data.response.outputs.cost;


// Updating the matching record with the calculated cost

await table.updateRecordAsync(recordId, {

'cost': cost

});

Script Breakdown
- Fetching Config Data: The input.config() method pulls data from the form submission, capturing the originZIP, destinationZIP, and weight fields.
- Validating Inputs: Before proceeding, the script checks if any of the fields are missing. If so, it throws an error, ensuring all inputs are provided.
- Querying the Airtable Table: The script retrieves all records in the table and searches for a match based on the originZIP, destinationZIP, and weight values submitted in the form.
- API Call: If a matching record is found, the script makes a POST request to the SpreadsheetWeb API, sending the input values to perform the calculation.
- Updating Airtable Record: Once the API response is received, the script extracts the cost value and updates the corresponding record in Airtable with the calculated cost.

Step 5: Activating Automation and Testing
Now that the automation is set up, make sure to turn it on. You are now ready to test the integration.
- Submit the form with the required inputs.
- Check the corresponding table to ensure that the record has been updated with the calculated cost from the API.

Conclusion
With this guide, you have successfully integrated Airtable with the SpreadsheetWeb API, allowing you to dynamically calculate values based on form inputs and update your Airtable records automatically. This method is a powerful way to bring advanced calculations to your Airtable applications while maintaining a user-friendly workflow.