In this guide, we'll talk about a simple way to enter data using Excel forms. This method doesn't involve complex programming and is great for handling large amounts of data.
Advantages of Using Excel Forms in Data Management
Entering data in Excel can become quite challenging, particularly when dealing with large datasets. Imagine you're faced with a table that has 30 columns and thousands of rows. Filling in data in such an extensive table can be daunting, time-consuming, and prone to errors. Navigating through such a vast grid increases the likelihood of input mistakes. Excel Forms streamlines this process by providing a more user-friendly interface for data entry. Instead of navigating the intimidating expanse of rows and columns, you can input your data into a form that systematically guides you through each field. This not only simplifies the data entry process but also makes it faster and more efficient.
While you can create forms through Visual Basic for Applications (VBA), this feature requires a certain level of coding knowledge, which many users may not possess. VBA allows for a high degree of customization and automation but is not accessible to everyone due to its complexity. In contrast, Excel Forms offer a simpler, more accessible solution. They provide an easy-to-use interface that doesn’t require any programming skills, making them suitable for a wider range of users. This accessibility is especially beneficial for those who need to work with data but aren’t necessarily tech-savvy. Excel Forms simplifies the process of data handling in Excel, making it possible for more people to efficiently manage and analyze data without the need to delve into the more technical aspects of the software.
How Do Excel Forms Work?
Excel Forms is a lesser-known feature that lets you put data into a form. This form then adds the data to an Excel table. It's especially useful when you need to update your data often.
Next, we'll review how to set up and use Excel Forms. We'll also give tips to make data entry more efficient and accurate. This can be helpful whether you're managing business records, doing academic research, or organizing personal data. Learning about Excel Forms can improve your work with data.

One of Excel's lesser-known but very useful parts is the Form command. This feature has existed since Excel 2007, but it's not always easy to find, especially in versions up to Excel 2019. In Excel 2019 and newer versions, it's more visible and can be found under the Data tab.
For those using older versions or who can't see the command easily, here's a clear guide on how to add the Form command to your Excel Ribbon for faster access.
How to Add the Form Command to Your Excel Ribbon
Follow the instructions below for adding form command to the ribbon in older Excel versions:
- Getting to Excel Options: Open Excel and click on the 'File' tab at the top left. Then select 'Options.' This opens the Excel Options dialog box, where you can customize Excel.
- Customizing the Ribbon: Inside Excel Options, choose 'Customize Ribbon.' Here, you can change what's on your Ribbon.
- Adding a New Tab or Group (Optional): If you want, create a new tab or group within an existing tab for better organization. Click 'New Tab' or 'New Group' to do this.
- Putting in the Form Command: On the left side of the dialog, look for 'Choose commands from.' Select 'All Commands' from this dropdown. You'll see a list of all Excel's commands. Scroll to find 'Form...' and add it to your chosen tab or group using the 'Add >>' button.
- Saving Your Setup: After adding the Form command, click 'OK' to save your changes and close the dialog box.
- Using the Form Command: Back in Excel, you'll see the Form command where you placed it. Click it to open the Form dialog for easier data entry.
This method helps those with older Excel versions or who like a more personalized setup to use the Form feature, enhancing data management and workflow.
Note for Users of Excel 2019 and Later
With Excel 2019 and newer versions, getting to the Form command is easier, part of Microsoft's efforts to improve their software's usability.
Easy Access to the Form Command in Excel 2019 and Beyond
- Direct Integration: The Form command is already in the Ribbon in these versions. No need to customize to add it.
- Finding the Command: It's located under the 'Data' tab, which deals with different data management tasks.
- Enhanced User Experience: This change shows Microsoft's commitment to making Excel more user-friendly, allowing for a smoother workflow.
This update in Excel simplifies data entry and becomes a stronger tool for handling big datasets and complex data management tasks.

For those using older versions of Excel where the Form command isn't automatically shown in the Ribbon, adding it manually is a simple task. This addition improves how you use Excel.
How to Add the Form Command in Older Excel Versions
To add the Form command in older Excel versions, just:
- Open Customize Options: Right-click on the Excel Ribbon and select 'Customize the Ribbon.'
- Find 'Customize Ribbon' in Excel Options: This lets you change what shows up on your Ribbon.
- Add the Form Command: Choose 'Form' from the list and add it to a tab on the Ribbon for easy access.

Detailed Steps to Add the Form Command
Customize the Excel Ribbon to include the Form command with these simple steps:
- Creating a New Tab and Group: First, add a new tab and group to your Ribbon for better organization. Click the 'New Tab' button, automatically creating a new tab and group. You can rename these for clarity, such as naming the tab 'Data Entry' and the group 'Forms.'
- Locating the Form Command: On the left panel of the Excel Options dialog, you'll find a list of commands under the 'Choose commands from' dropdown menu. Set this dropdown to 'All Commands' to view the full list of available Excel commands. Scroll through this list to locate the 'Form' command.
- Adding the Form Command to the Ribbon: Once you've found the Form command, select it and use the 'Add >>' button to include it in your newly created group under the new tab. This action places the Form command where you can easily find it.
- Saving Your Customization: After adding the Form command to your preferred location, click 'OK' to save these changes. Your Excel Ribbon will reflect this update, displaying the Form command in the specified tab and group.
By following these steps, you'll have the Form command readily available in your Ribbon, streamlining your data entry process in older versions of Excel.

Now, you are ready to use forms.
View Data in Excel Form
Excel Forms offers a user-friendly interface for viewing and editing data, whether working with an existing dataset or starting a new table. Here's how to efficiently use Excel Forms for both scenarios:
Using Excel Form in Existing Data Sets
First, click on any cell within your dataset to view or edit your data using Excel Form. This lets Excel know which specific data you want to work with. Once you've selected a cell, click the 'Form' button previously added to the Ribbon. Doing so will open up the Excel Form interface, where the data from your selected row is displayed in a user-friendly and easy-to-navigate layout.
Creating a New Data Set Using Excel Form
If you're starting from scratch, the first step is to write down your column titles in a new worksheet. These titles will act as field labels in the Excel Form, so make sure they accurately represent the data you intend to capture. Once your column titles are set, select them and convert the range into an Excel Table. This is done by navigating to the 'Insert' tab on the Ribbon and selecting 'Table.' Ensure you check the box for 'My table has headers' to recognize your titles as table headings. With your table ready, click on any cell within this table, then press the 'Form' button in the Ribbon. The Excel Form will open, showing empty fields corresponding to your column titles, ready for you to enter data.
Navigating Data in Excel Form
Once you have the Form open, it becomes much simpler to navigate through your data. For existing datasets, you can browse records using the navigation buttons in the Form. If you're entering new data, the Form provides a structured layout for input, reducing the likelihood of errors and making the process more intuitive.
In both cases, Excel Form is an excellent tool for managing your data efficiently. It streamlines data entry and editing, especially in large or complex datasets, and enhances overall productivity in Excel.

The Excel Form dialog is a handy tool in Excel that shows each piece of data in a row, one below the other. This makes it easy to see and work with your data.
What You'll Find in the Excel Form Dialog
In an Excel Form, each column from your Excel sheet is represented as a separate field, arranged vertically. This layout creates an individual box for each piece of information, stacking them on top of each other. This design helps you concentrate on one data point at a time, making it easier to focus and reducing the chance of errors. The fields where you can input or modify data appear as text boxes. You simply click in these boxes to add or edit the information you need. This user-friendly arrangement makes data entry more organized and less overwhelming than the traditional row-and-column setup of Excel.
For parts of your table that perform calculations, like summing up numbers, these appear as labels in the Form. These labels are not editable, as they are there to display the outcomes of the calculations automatically. When you enter or update data in the Form and hit 'Enter', it instantly reflects any changes in these calculations. This immediate feedback is extremely useful, as it allows you to see the impact of your changes in real-time. Navigating through different data sets in the Form is also straightforward. There are buttons provided to move forwards or backwards through your records, enabling you to easily access and alter various sections of your data without the hassle of scrolling through endless rows and columns.
The Excel Form dialog is a great tool for making it easier to put in, look at, or change your data, especially when you have a lot of it. It's set up in a way that makes everything clear and straightforward.

In the Excel Form, you can move around and see different sets of data easily. There are a few ways to do this:
- Using the Scrollbar: On the side of the Form, there's a scrollbar. You can click and drag it up or down to see different parts of your data.
- Using Buttons for Moving: There are 'Find Prev' and 'Find Next' buttons in the Form. Click 'Find Prev' to go back and see the data you entered before. Click 'Find Next' to move forward and see the next set of data.
- Keyboard Shortcuts for Quick Navigation:
- Up and Down Arrow Keys: If you prefer using the keyboard, you can press the up arrow key to go to the previous data, just like the 'Find Prev' button. The down arrow key works like the 'Find Next' button, taking you to the next set of data.
- Page Up and Page Down Keys: These keys help you move faster. Press 'Page Up' to go back 10 entries at once. Press 'Page Down' to go forward 10 entries. This is useful when you have a lot of data and want to move through it quickly.
All these options make it easy for you to look through your data in the Excel Form. You can choose the way you like best, whether it’s clicking buttons, using the scrollbar, or pressing keys on your keyboard.

To put new information into your table using the Excel Form, you can follow these easy steps:
- Starting a New Entry: First, click the 'New' button. This will make all the boxes in the Form empty and ready for you to add new information. If you're already looking at your data and reach the end, the Form will automatically prepare you to add something new.
- Entering Your Information: Now, type your information into each box. After typing in one box, press the 'Tab' key on your keyboard. This moves you to the next box where you can keep adding more information.
It's that simple! Click 'New', type your information, and use the 'Tab' key to move between the boxes.

Pressing Enter or clicking the New button submits the new entry and clears the fields to allow a new entry.
Editing or removing an existing entry
To change or delete information that's already in your table, here's what you can do:
Changing Information:
- Editing Data: Click on the box with the information you want to change and type the new information. You can change anything except for the numbers that Excel calculates for you.
- Saving Your Changes: After you've made your changes, press the 'Enter' key. This saves the new information in your table.
Undoing Changes:
If you change your mind and want to return to how it was before, press the 'Esc' key. Or, you can click the 'Restore' button. Both of these will undo your changes and return the original information for that entry.
Filter entries in Excel Form
You can use filters in Excel Form to find specific information in your table quickly. Filters help you see only the information you need.
How to Set Up a Filter:
- Start the Filter: First, click on the 'Criteria' button. This opens a special form part where you can set your filter.
- Enter What You're Looking For: In this part, you'll see boxes like in the normal Form. Type in what you're searching for in these boxes. For example, if you want to find a specific name, type that name into the correct box.
By doing this, Excel will only show you the information that matches what you typed, making it easier to focus on certain entries.

To find specific things in your Excel table using a filter, here's what you can do:
- Set Your Filter: After you've typed in what you're looking for in the filter section (like a name or a number), you have two ways to start the filter:
- Press the Enter Key: Just hit 'Enter' on your keyboard.
- Use the 'Find Prev' or 'Find Next' Buttons: Click on either of these buttons to search for your information.
- See the Filtered Information: Once you apply the filter, Excel will show you only the entries that match what you typed. You can use the 'Find Prev' or 'Find Next' buttons to move through the results.
Tips
Clearing or Going Back: If you want to start over with your filter, click the 'Clear' button. If you want to return to what you had filtered before, click the 'Restore' button.
Using Wildcards: In your filter, you can use special symbols called wildcards to search differently. For example, if you type something like '*FLYING', it will find entries that end with 'FLYING' and have any characters before it.

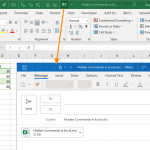
Here is the Excel Form window after applying filter: