Power Apps, a powerful low-code platform by Microsoft, enables users to rapidly build and deploy custom applications without requiring extensive programming knowledge. It allows for interaction with various data sources, workflow automation, and integration with external services through APIs. Azure API Management complements this by helping developers manage, secure, and monitor APIs, offering a unified platform to publish and scale services securely. By integrating SpreadsheetWeb’s API into PowerApps through Azure API Management, users can take advantage of SpreadsheetWeb's capabilities for handling complex Excel-based calculations and workflows, while ensuring that the API interactions are secure, efficient, and easily managed via Azure’s tools.
To Begin with: Transforming Your Excel File into an API with SpreadsheetWeb
Before getting into the technical details of integrating the SpreadsheetWeb API with Power Apps, it’s important to introduce the example Excel file that will be utilized. This file is crucial, as it contains the inputs and calculations that the API will use. In this case, the example Excel file includes:
- Three individual input cells: originZIP, destinationZIP, and weight
- One output cell: cost

These inputs generate the output (cost) based on the input values using formulas, functioning much like a typical Excel calculator.
To begin using the SpreadsheetWeb API, you first need to upload your Excel file to the SpreadsheetWeb Hub, where you will create an application. This process converts your spreadsheet into an API that can be accessed programmatically.
API Setup Overview
Even though this guide focuses on integrating with Power Apps, it’s important to note that creating an API from your SpreadsheetWeb application provides key details necessary for configuring the API within Power Apps. These details include:
- API Endpoint URL
- Workspace ID
- Application ID
- Authentication settings (if applicable)
These pieces of information will be used to establish the connection between Power Apps and the SpreadsheetWeb API. For more detailed instructions on creating an API from a SpreadsheetWeb application, you can refer to the step-by-step guide in our documentation.
SpreadsheetWeb API Authentication Options
The SpreadsheetWeb API offers two options for API calls:
- Token-Based Authentication: The most secure option, which involves sending a Bearer token in the request headers to authenticate and authorize API requests.
- No Authentication: A simpler option, often used during development or when security requirements are less strict. This option is helpful when testing internally or when less security is acceptable.
For simplicity, we will proceed with no authentication in this guide. This approach allows for a more straightforward setup in Power Apps without the need to configure authorization headers. However, if your use case requires additional security, you can enable token-based authentication in SpreadsheetWeb. In such cases, you’ll need to set up Power Apps to send the Bearer token in the Authorization header for API calls.
Using no authentication simplifies the initial setup, but we strongly recommend enabling token-based authentication for production applications to safeguard your API from unauthorized access.
Setting up Azure API Management for the SpreadsheetWeb API
Now that the Excel file is converted into an API, the next step is to set it up in Azure API Management, which will allow us to call the SpreadsheetWeb API and handle the necessary requests and responses in Power Apps.
Step 2.1: Create a New API in Azure API Management
- Navigate to the Azure API Management portal.
- On the left sidebar, click on APIs.
- Select the HTTP option to create a new HTTP API.

- Name your API (for example, “SpreadsheetWeb API”) and proceed to the Design tab.
- In the Web Service URL field, enter: https://api.spreadsheetweb.com.

- Under Authentication Settings, configure your API key or OAuth setup (as needed by your API provider).
- Set the Schema to HTTPS for secure communications.

Step 2.2: Configure API Operations
- Under the Operations tab, create a new operation for the API.
- In the Frontend section, configure the Display Name as “Calculate Shipping Cost”.

- Set the URL as /calculations/calculatesinglesimple and choose POST as the method.
- Next, go to the Headers section, where you'll need to manually add the Content-Type header with the value application/json.

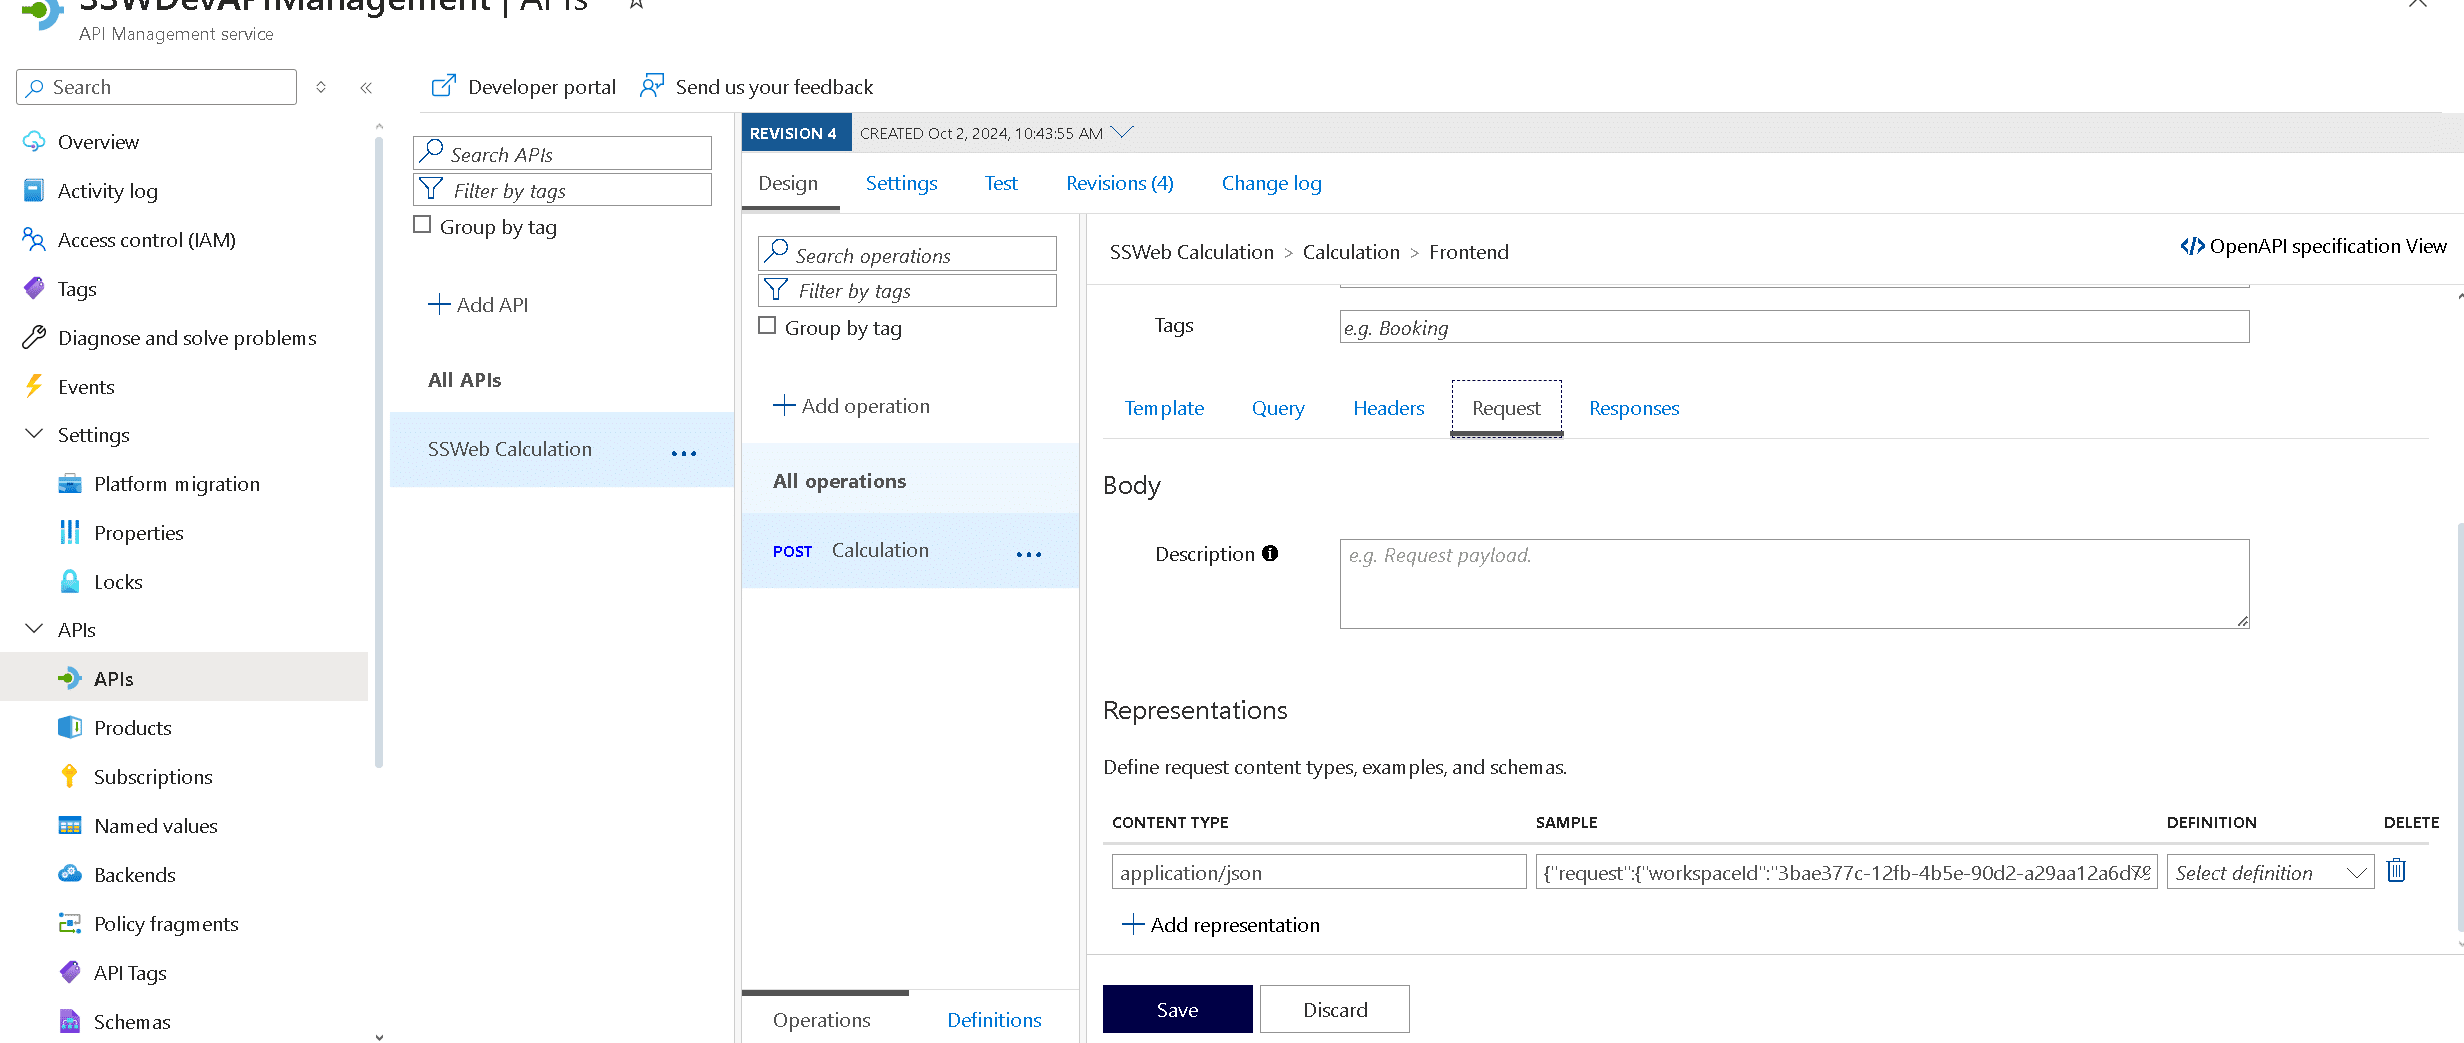
Step 2.3: Add Request Body
- Move to the Request tab and add the following JSON in the Body field:
{

  "request": {

    "workspaceId": "3bae377c-12fb-4b5e-90d2-a29aa12a6d79",

    "applicationId": "f8da5ff3-26dd-473c-9331-e43322e923ed",

    "inputs": {

      "originZIP": "10001",

      "destinationZIP": "90001",

      "weight": "1"

    },

    "outputs": ["cost"]

  }

}
- Ensure that the Content-Type is set to application/json.
Step 2.4: Add Response Body
- Switch to the Response tab and add a response body for testing:
{

  "response": {

    "outputs": {

      "cost": "8.5785"

    },

    "timingsSeconds": null,

    "performanceInformation": null,

    "isError": false,

    "messages": null

  }

}

- Set the response type as application/json and the response code as 200 OK.

Step 2.5: Test the API
- Save your settings and proceed to the Test tab to verify that the request and response are configured correctly.
- Creating a Custom Connector for Power Apps
Once the API is set up in Azure API Management, the next step is to create a custom connector in Power Apps to use the API.
Step 3.1: Get Your API Subscription Key
- Navigate to Subscriptions in the Azure portal.
- Copy one of the built-in all-access subscription keys. You will need this key when adding the API to Power Apps.

Step 3.2: Add the API to Power Apps
- Open Power Apps, and in the left pane, click on Data.
- Add a new data source and choose Custom Connector.

- Enter the API’s base URL and paste the Subscription Key when prompted.
- Power Apps will now have access to the SpreadsheetWeb API.
Designing the Power Apps Interface
With the API connected, it's time to design a user-friendly interface in Power Apps.
Step 4.1: Create the App UI
- In Power Apps, create a new canvas app.
- Add three Text Input fields for the user to enter originZIP, destinationZIP, and weight.
- Add a Button labeled Submit to trigger the API call.
- Add a Label to display the calculated cost.
Step 4.2: Name the Input Fields
- Name your input fields appropriately:
- originZIP
- destinationZIP
- weight
- Name the output label as costLabel.

- Setting Up Power Automate Flow
To link the API with the user inputs, we will create a flow in Power Automate.
Step 5.1: Create a New Flow
- In Power Apps, navigate to Power Automate and create a new flow.

- In the first step, add three Text Input fields corresponding to the originZIP, destinationZIP, and weight.

Step 5.2: Call the API
- Add a Custom Action step and choose the connector we previously created.
- Use the following request body and dynamically map the inputs:
{

  "request": {

    "workspaceId": "3bae377c-12fb-4b5e-90d2-a29aa12a6d79",

    "applicationId": "f8da5ff3-26dd-473c-9331-e43322e923ed",

    "inputs": {

      "originZIP": "@{triggerBody()['text']}",

      "destinationZIP": "@{triggerBody()['text_1']}",

      "weight": "@{triggerBody()['text_2']}"

    },

    "outputs": ["cost"]

  }

}

Step 5.3: Configure the Response
- Add a When an HTTP Request is Received step, and enter the response body:
{
"response": {
"outputs": {
"cost": "@{body('Calculation_2')?['response']?['outputs']?['cost']}"
}
},
"timingsSeconds": null,
"performanceInformation": null,
"isError": false,
"messages": null
}

Connecting the Flow to the Power Apps Button
Now, we will map the inputs and outputs to the Power Apps button and label.
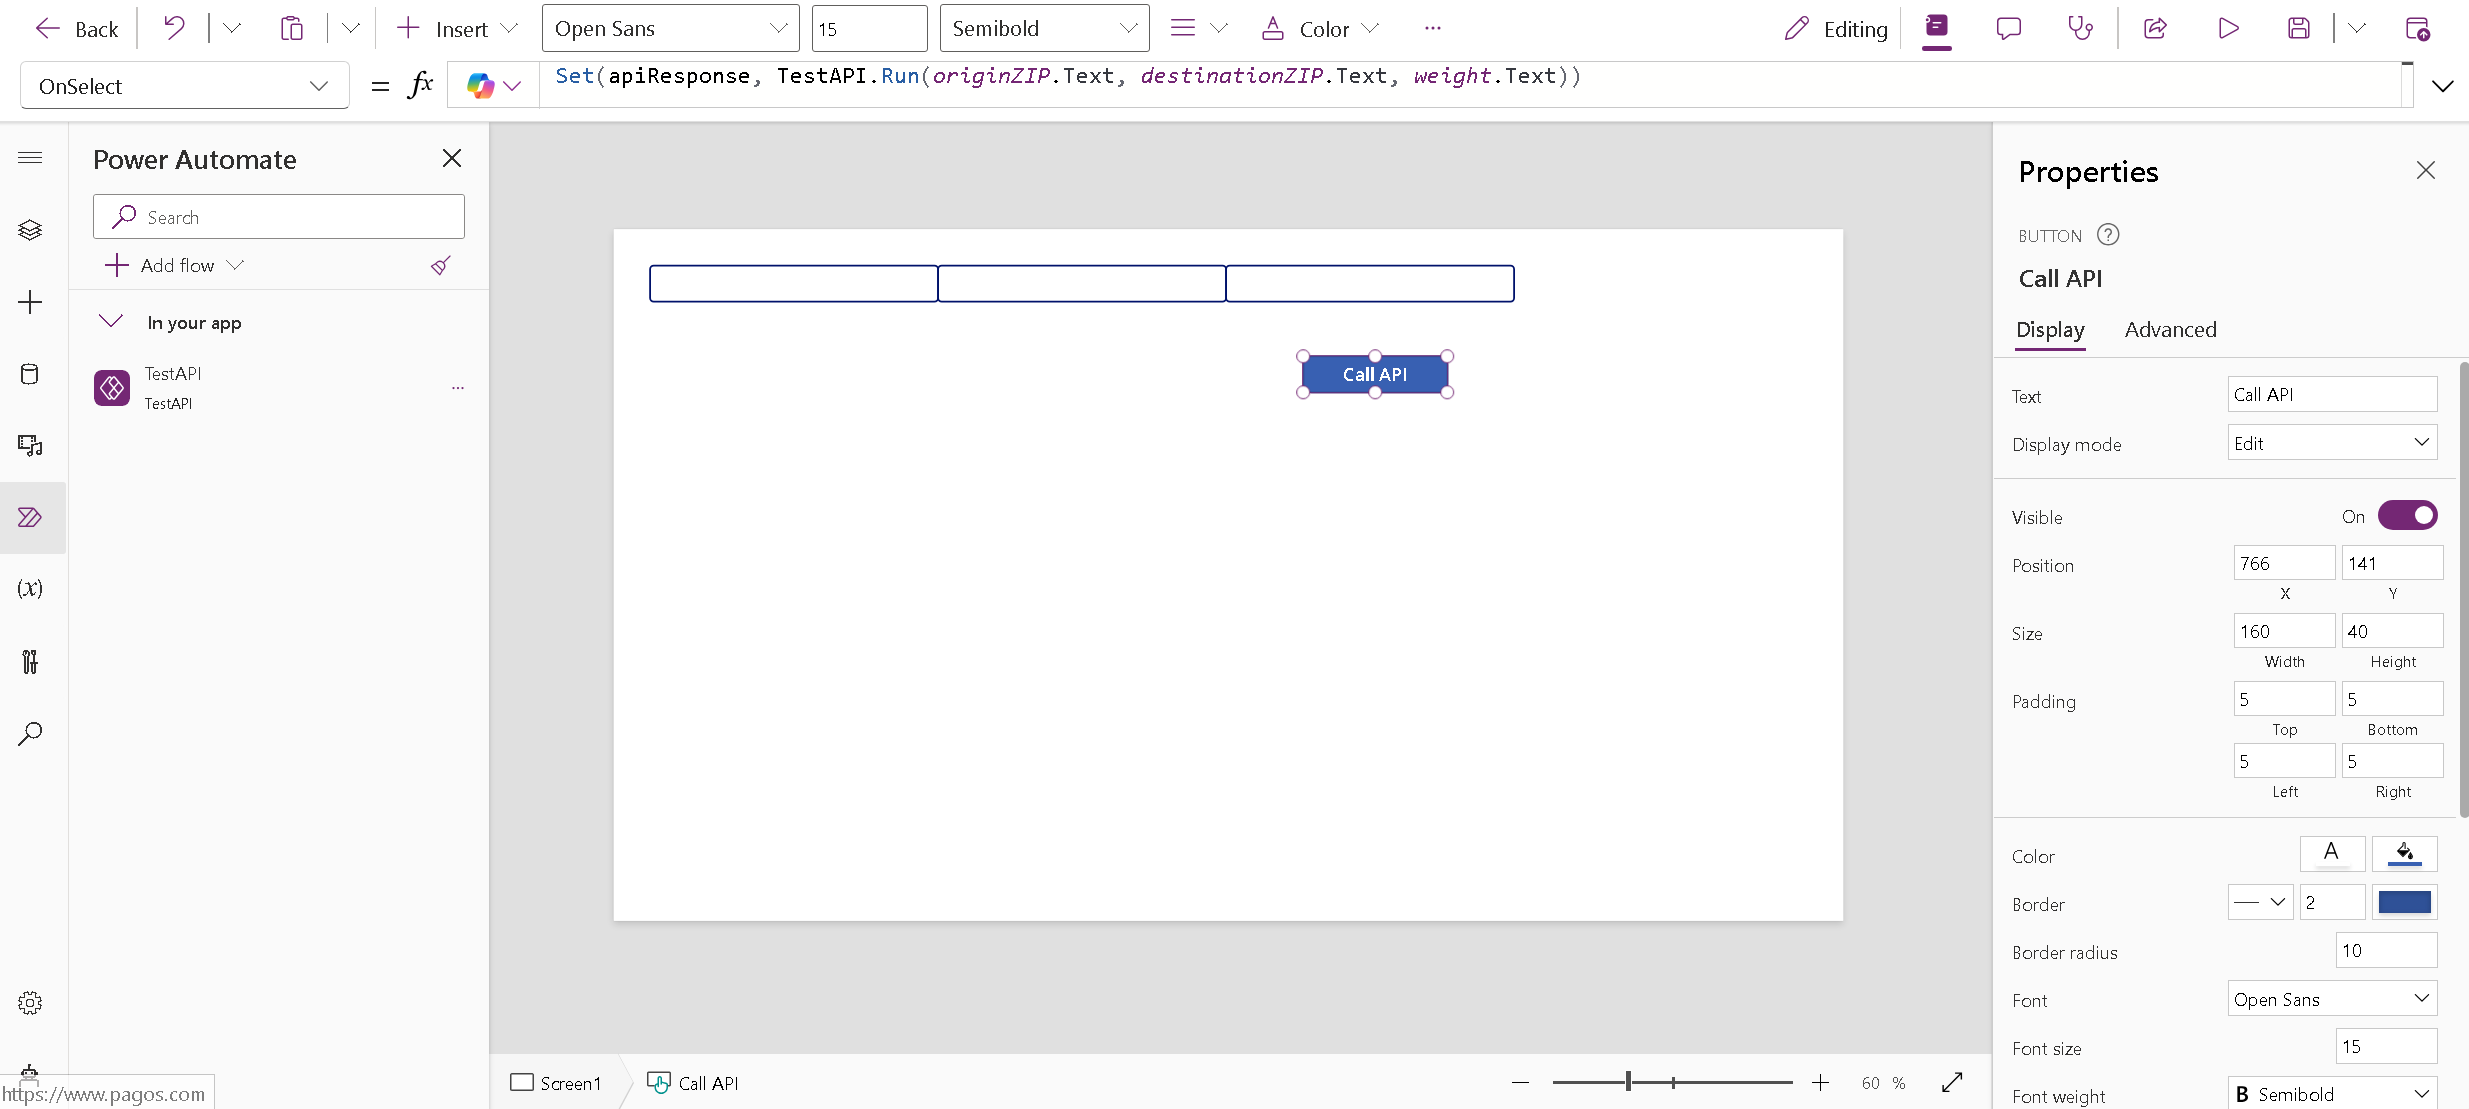
Step 6.1: Map the Button to Trigger the Flow
- Go back to the Power Apps designer, select the Submit button, and map it to trigger the flow using the following formula:
Set(apiResponse; TestAPI.Run(originZIP.Text; destinationZIP.Text; weight.Text))
Step 6.2: Display the Output
- Select the label that will display the cost.
- Set the formula to display the cost from the API response:
Text(apiResponse.response.outputs.cost)

Testing and Finalizing
Once everything is set up, test your Power Apps application by entering values in the text inputs and clicking Submit. The cost value from the API response should now display in the label.
Conclusion
By following this guide, you’ve successfully integrated an Excel-based calculation through the SpreadsheetWeb API into Power Apps using Azure API Management. This integration allows users to dynamically input data, trigger API requests, and receive real-time outputs, streamlining processes and improving efficiency.