If you find yourself repeatedly performing the same actions in Excel, such as formatting data in a specific way, copying and pasting information between sheets, or generating the same type of report, it might be time to start using macros. Creating a macro is actually very easy! In this article, we are going to show you how to create a macro in Excel.
What is an Excel Macro?
A macro in Excel is a sequence of instructions or commands that automate repetitive tasks by bundling them into a single action. Macros are written in Visual Basic for Applications (VBA), which is the programming language used by Excel and other Office applications. They can be used to perform a wide range of tasks such as formatting cells, creating complex formulas, managing data, and even interacting with other Office applications.
Macros in Excel date back to the first versions of Microsoft Excel in the mid-1980s. Initially, macros were simple, recorded sequences of keystrokes and commands that users could replay to automate repetitive tasks. These early macros were limited in functionality and scope but provided a foundation for automation.
A significant milestone in the history of Excel macros was the introduction of Visual Basic for Applications (VBA) with Excel 5.0 in 1993. VBA extended the power of macros by allowing users to write procedural code to automate tasks, manipulate data, and customize Excel's user interface. VBA became a standard feature in later versions of Excel, enabling more complex and powerful automation possibilities.
As the use of macros and VBA became more widespread, so did the potential for malicious use. Macros could be used to write viruses or other harmful code. In response, Microsoft introduced security features to manage macro execution, such as disabling macros by default and providing security warnings when opening files containing macros. These measures were introduced in the late 1990s and early 2000s to protect users from potential threats.
In more recent versions of Excel, Microsoft has continued to improve VBA, adding new features and capabilities to keep up with modern computing needs. Additionally, with the advent of Excel for the web and mobile platforms, Microsoft introduced Office Scripts for Excel on the web, a newer automation feature similar to macros but based on JavaScript, offering cloud-based automation capabilities.
How to Create a Macro in Excel
The steps involve opening the Visual Basic (VBA) window, entering your code, and saving your file with the correct extension.
1. Open Visual Basic for Applications (VBA) window
Before jumping into writing the code, you will first need to access the Visual Basic for Applications (VBA) window. There are 2 ways you can do this - Either press the Alt+F11 key combination on your keyboard, or click on the Visual Basic icon in Developer tab of the Ribbon. If you haven't added the Developer tab before, you will not be able to see it as the Developer tab is hidden by default. See how to display Developer tab in Excel for more details.

2. Add a Module
VBA window lists the elements of your project on the left panel. The workbook itself and existing worksheets are the default elements. The right side is empty if there isn't any existing code. You need to add a module to your project to enter your code. A module is a basic text editor where you can enter your code and save it within the workbook (project).
To add a module into your project:
- In the VBA window, click Insert on the toolbar
- Click the Module option

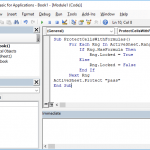
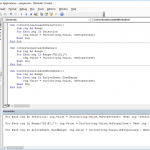
3. Write Your Code
After inserting a module, the module window becomes visible at the right panel once empty. You can write or copy and paste code here. If you need sample codes, see VBA samples.
In the Visual Basic for Applications (VBA) editor within Excel, the module screen is a key interface where you write and manage your VBA code, including macros and functions. At the top of this module screen, you'll typically find two dropdown menus that serve different purposes, depending on the context of your work—whether you're dealing with a form or a standard module.
Objects Dropdown (Left Dropdown): When working within a UserForm in the VBA editor, the left dropdown menu is populated with a list of objects that are relevant to the UserForm. These objects could include the UserForm itself and any controls placed on the form, such as buttons, text boxes, dropdown lists, and other interactive elements. This dropdown allows you to quickly select and work with these objects in your VBA code.
Events Dropdown (Right Dropdown): Upon selecting an object from the left dropdown menu, the right dropdown menu dynamically updates to show a list of events that are applicable to the selected object. Events are specific actions or triggers that can occur within the application, such as clicking a button, changing a text box, or initializing the form. Selecting an event from this dropdown will either take you to the existing VBA code associated with that event (if any has been written) or provide you with a template to start writing new code for the selected event.

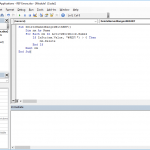
However, the behavior of these dropdowns changes when you are in a standard module rather than a form:
- In a standard module, the left dropdown menu does not list objects because standard modules are not tied to specific forms or their controls. Instead, they're used for writing general-purpose macros and functions that can be called from anywhere in the workbook.
- The right dropdown menu in a standard module context lists the names of macros (subroutines) and functions that are defined within that module. This makes it easy to navigate through your code; by selecting a macro or function name from this dropdown, the editor will immediately move the cursor (pointer) to the location of the selected macro or function, allowing you to view or edit the code directly.
4. Save as Excel Macro-enabled Workbook (XLSM)
With the 2007 version, Excel has started to use different file types for regular Excel workbooks and workbooks with macros. When you create or record a macro in Excel, the workbook becomes a macro-enabled file. If you attempt to save this workbook in the standard XLSX format, Excel will display a warning. This warning indicates that the macros will not be saved with the workbook if you proceed, effectively losing any VBA code present in the file. To create a macro in Excel, you must save the file as an XLSM file.
Follow the steps below to save your workbook as an XLSM file:
- Go to "File": Click on the "File" tab in the Ribbon.
- Choose "Save As": Select "Save As" from the menu options.
- Select File Format: In the "Save as type" dropdown menu, choose "Excel Macro-Enabled Workbook (*.xlsm)".
- Save: Name your file and click "Save".