Excel offers a unique feature to personalize user experience: displaying a welcome message. This article guides you through the simple yet effective process of setting up a welcome message in Excel, a small touch that can significantly enhance the user experience, especially in shared or template workbooks.
Why Use a Welcome Message in Excel?
Incorporating a welcome message in Excel offers a unique opportunity to enhance user interaction and guide them effectively through complex workbooks. Such a message can provide vital instructions for navigation, highlight crucial data areas, or explain proper data entry procedures. This feature is especially beneficial in corporate settings, where workbooks are often shared among multiple users. By setting clear expectations right from the start, a welcome message can also help in maintaining data integrity and ensuring that users adhere to specific standards or deadlines.
Beyond functionality, a welcome message in Excel allows for personalization and branding. Businesses can use this feature to reinforce their brand identity, creating a more professional and cohesive look across their documents. This approach not only enhances the aesthetic appeal but also boosts user engagement, making the experience more interactive and personalized. Additionally, it can serve as a tool for error prevention, offering warnings or essential information to users, such as the need to enable macros or avoid altering specific formulas.
A welcome message can significantly improve collaboration and efficiency in shared workbooks. It provides a platform to communicate updates, changes, or important notes, ensuring all users are well-informed and aligned. Furthermore, the dynamic nature of these messages—capable of changing based on time, day, or user—adds an interactive element to the workbook. Overall, a well-crafted welcome message in Excel not only makes the workbook more user-friendly but also transforms it into a more efficient and engaging tool for data management and collaboration.
Step-by-Step Guide to Create a Welcome Message
Enabling Developer Tab
Before you can begin creating a welcome message in Excel, it's essential to have access to the Developer tab, which isn't visible by default. This tab is your gateway to advanced features, including the Visual Basic for Applications (VBA) editor where you'll write the code for your message. To enable the Developer tab, start by clicking on the 'File' menu at the top left corner of Excel. From there, select 'Options', which opens a new window where you can customize various Excel settings. In this window, navigate to the 'Customize Ribbon' tab on the left-hand side. Here, you'll find a list of tabs that can be added to your Excel ribbon. Look for the 'Developer' checkbox in the right pane and tick it. Once you've checked this option, the Developer tab will appear on your Excel ribbon, granting you access to the tools needed to create custom scripts and macros, including your welcome message.
Accessing the VBA Editor
Under the Developer tab, click on Visual Basic to open the VBA (Visual Basic for Applications) Editor, your tool for creating the welcome message in Excel.
Inserting a New Module
In the VBA Editor, right-click on your workbook name in the Project Explorer. Select Insert, then Module, adding a new module for your code.
Writing the Welcome Message Code
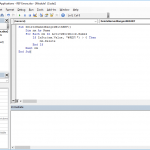
If you want to trigger any action at the startup of your workbook, you must add your code under Workbook_Open. The event must be added into the ThisWorkbook object of your workbook.
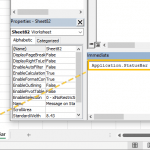
You can open the ThisWorkbook object by simply double-clicking on its name in the Project Explorer pane of the Visual Basic for Applications (VBA) window.

The code to show a welcome message
You have two options to show a welcome message in Excel: Either use a simple message box (MsgBox) or create your own form and call the form. The message box method is relatively easier to do compared to the form: All you need is a single line of code with your message.
MsgBox "Thank you for using our workbook"
This line pops up a message box with an OK button.

Private Sub Workbook_Open()
    MsgBox "Thank you for using our workbook"
End Sub
Let's continue with a few customization options that you can apply to welcome message boxes.
Multi line message
By default, a message box displays your message in a single line. If you want to see more lines in your message box, add the vbNewLine value into the text.
MsgBox "Thank you for using our workbook" & vbNewLine & "SpreadsheetWeb.com"

Dynamic values
You can also concatenate your welcome text with a value in your workbook to add a dynamic value. For example, the following example demonstrates displaying values in cell B4, along with the message itself.
MsgBox "Thank you for using our workbook. " & [B4]

Modifying message icon and message box title
The default configuration of the message box in Excel VBA is quite basic, displaying a plain text message with a standard "Microsoft Excel" title, devoid of any formatting or icons. However, this can be extensively customized by supplying additional arguments in the VBA code. For instance, you can modify the title of the message box to something more specific to your context or application, rather than the default title. Icons and buttons can also be added to the message box to make it more interactive and visually appealing. These icons could range from information symbols, warning signs, to question marks, each serving a distinct purpose and conveying a different tone.
The second argument of the MsgBox command determines what the message box includes, like buttons or icons. There are four (4) constant values for icons:
| Constant | Description |
| vbCritical | Shows the critical message icon |
| vbQuestion | Shows the question icon |
| vbExclamation | Shows the warning message icon |
| vbInformation | Shows the information icon |
The following is an example for using an information icon.
MsgBox "Thank you for using our workbook.", vbInformation

The next argument is for the title. Enter a string value to alter the title of the message box.

If you want to change the title only, omit the second argument. Note that the repeating commas (, ,) indicate the second argument.
MsgBox "Thank you for using our workbook.", , "Welcome"

Save your workbook to ensure showing a welcome message
Close the VBA Editor and save your workbook as an Excel Macro-Enabled Workbook (.xlsm), crucial for preserving the macro that displays the welcome message.
Integrating a welcome message in Excel is a straightforward way to personalize and enhance the user experience. By following these simple steps, you can create a welcoming and informative environment for users of your Excel workbooks. Whether for business, education, or personal use, this small addition can make a significant impact.