The dice roll is a common way of generating random numbers. It's unnecessary to talk about dice's role in board and role-playing games. Although a simple formula can give what you need easily, you can make the dice rolling fancy in Excel. In this guide, we’re going to show you How to roll dice in Excel in 3 ways.
Formula to Roll Dice
Excel has three formulas for generating random numbers:
- RAND: Returns a random decimal number between 0 and 1.
- RANDBETWEEN: Returns an integer between specified upper and lower limits.
- RANDARRAY: Returns one or multiple decimal or integer numbers between upper and lower limits.
A dice has six sides, representing six integers from 1 to 6. Thus, using integer-returning functions RANDBETWEEN and RANDARRAY suits our cause. Also, you can use the newer RANDARRAY function that was released to replace both legacy RAND and RANDARRAY functions. However, Microsoft allows this function and dynamic array features for Microsoft 365 subscribers.
Each function returns a randomly generated number every time the workbook is calculated. You can do the calculation by pressing the F9 key on your keyboard. You can create a button that triggers the calculation to make it fancy. You only need to record a macro to dice roll, press the F9, and stop recording. Now, you can assign your macro to a command button.
RANDBETWEEN
All you need to do is give the function lower and upper limits. You must copy and paste the formula to roll dice more than once.

RANDARRAY
Due to its flexibility, the RANDARRAY function is less direct than RANDBETWEEN. However, the ability to fill multiple cells with a single formula is a killer feature.
The RANDARRAY function needs filling several rows and columns, minimum and maximum values, and a Boolean value to determine whether to return integer or decimal values.
For example, our sample formula fills three rows by 2 column range with integer numbers between 1 and 6:

A single formula is enough to fill a 3 * 2 range. Press the F9 key to see different rolls.
Although the formulas can give the needed numbers, they are just numbers. Boring! Let's see what we can do to get a cooler look.
How to Roll Dice in Excel with Dots
You might have already thought of using cells to generate a dice shape. But creating dots in a dice might seem like a problem at first. Thanks to the Wingdings font support of Excel, you can display big dots easily. Let's start.
We will use two dice formulas to keep things easy to roll dice. Each dice will need its cell. Since dots on a dice are separated into nine cells (3*3), we will need a similar range of cells with equal row heights and column widths.

Once the dice boxes are ready, select them and set Wingdings as their font. After that, type "l" (lowercase L without quotes) into boxes to see if the dot looks as you want. You may want to change the font size.

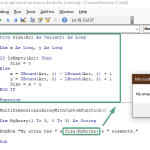
Now, it's time to add formulas, but a reminder first: We named our cells Dice_1 (C6) and Dice_2 (C7) to ease the formula writing.
The formulas will display or hide the dots according to the dice value. Thus, the logic should be consistent with the dice layout. For example, the center dot is available for only 1, 3, and 5. On the other hand, the dot at the top left and bottom right is not available for one only.
Here are the formulas:
| 2, 3, 4, 5, 6 | =IF(Die_1>=2,"l","") |
| 6 | =IF(Die_1=6,"l","") |
| 4, 5, 6 | =IF(Die_1>=4,"l","") |
| 1, 3, 5 | =IF(ISODD(Die_1),"l","") |

You can also remove the coloring and borders for a more real-life dice look.

Camera Tool for Even More
Our final approach is a hidden feature of Excel: Camera Tool. Excel has a tool that allows you to take a dynamic snapshot of a range as an image. Once the image is created, you are not bound to cell height width and font sizes. You can adjust its dimensions or rotation as you want.
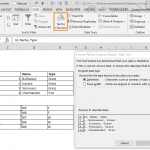
First, add the command to your Excel's Ribbon or Quick Access Toolbar. Follow the steps to do that:
- Open Excel Options under File.
- Select either Customize Ribbon or Quick Access Toolbar.
- Choose All Commands to see all available commands.
- Find the Camera.
- Click the Add button to move features from one list to the other. The commands list is on the right.
- Click OK to save your changes.

- Once added, select dice range to roll dice.
- Click the Camera
- Use the cursor to create the image.
 After created, you can move or modify your image.