
You’ve converted your Excel file into a web application. Now you want only specific people to use it. This guide walks you through the end-to-end flow: choosing the right access type, defining a user (identity) template, inviting users, and what your users experience during registration. We’ll also cover how to let users view and edit their own saved data.
1) Set the Access Type to Require Authorization
Where: Application → Design
SpreadsheetWeb supports multiple access patterns. The most common are:
- Allow Anonymous: Anyone with the link can open the application—no sign-in required.
- Require Authorization: Only authenticated users who have been granted access can open the application.
Tip: Keep Allow Anonymous only for demos or non-sensitive tools. Anything with proprietary logic or data should use Require Authorization.

2) Create a User Template (Identity Template)
Where: Users → Identity Templates
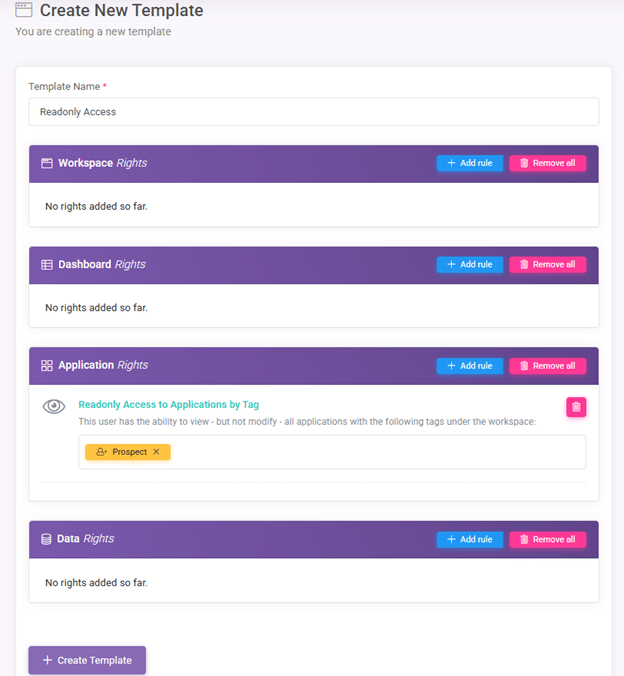
A User Template defines the default identity and permissions assigned to invited users. Think of it as a reusable profile you attach to invitations so you don’t configure each person from scratch.
Typical elements in a template include:
- Application Access: Which apps a user can see and launch. Use by Tag options.
- Access Scope: Whether they can execute apps only (read-only access) or have full access including edit and delete.
Good practice: Create separate templates for user personas with different access privileges (e.g., “External Clients,” “Field Reps,” “Analysts”). This minimizes errors and speeds up onboarding. If you have multiple applications in your workspace and want to grant access to only one, use Tags to tag the application and include that tag in your access rights using the Readonly Access to Application by Tag rule.
3) Invite Users to Access Your Application
Where: Users → Invite
With your template ready and your app set to Require Authorization, you can invite users:
- Open Invite.
- Enter email addresses (one or many).
- Select the User Template you created in Step 2.
- Customize the message users will receive.
- Send the invitations. Users receive an email with a registration link.
Seats matter: Your workspace must have enough user seats to cover all invited users. If you exceed your seat count, some invitations will not activate until additional seats are available or freed up.
To prevent spamming, you can invite a maximum of five users at once.
Managing invitations:
- Pending invites can be resent or canceled.
- Accepted invites become active users with the assigned template.

4) User Registration and First-Time Access
Here’s what your invitees experience:
- Email Invitation: They receive an email with a secure link.
- Account Setup: They create a password and complete any required profile fields.
- Confirmation: They receive a confirmation email for security purposes.
- Hub Login: After registering, users sign in to the Workspace Hub.
- Launch the App: The application(s) permitted by their template appear on the Hub → Applications page. Users click to launch.

Accessing Applications with Data Storage (Let Users See/Edit Their Own Records)
If your application captures and stores user-submitted data, and you want users to return later to view or edit their own records, perform these additional steps.
1) Enable Data Access in the User Template
Within the same User Template used for invitations:
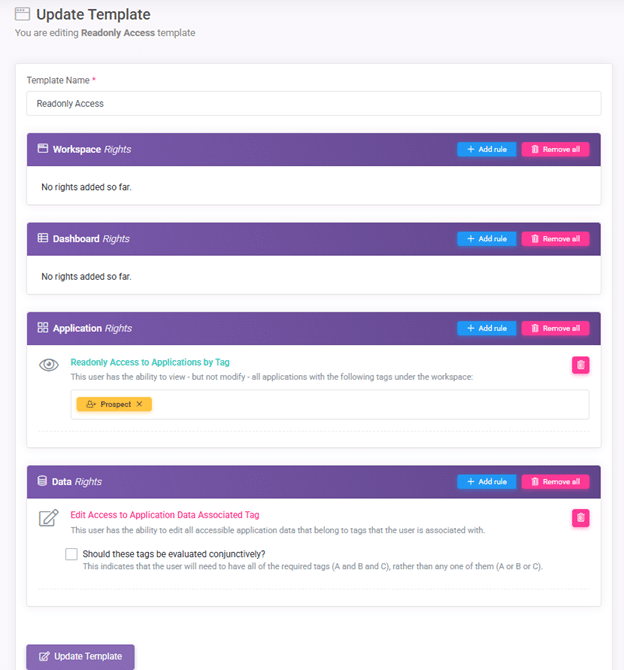
- Add a Data Access rule called Edit Access to Application Data Associated Tag. This rule allows the user to view and edit their own records (and only their own, unless you intend broader access).
- Save the template. New users invited with this template will inherit these permissions automatically.
Security first: Be deliberate with Data Access. Most external users should see only their own records.
2) Tell Users to Access Their Data via the Hub
Once registered, users should log in to the Hub to manage their saved records:
- Go to Hub → Data.
- Select the application’s dataset.
- View or edit their records from the list.
By default, SpreadsheetWeb lists records by Record ID, which can be confusing. You can make this page much more user-friendly.


3) Configure the Data Page to Show Friendly Columns
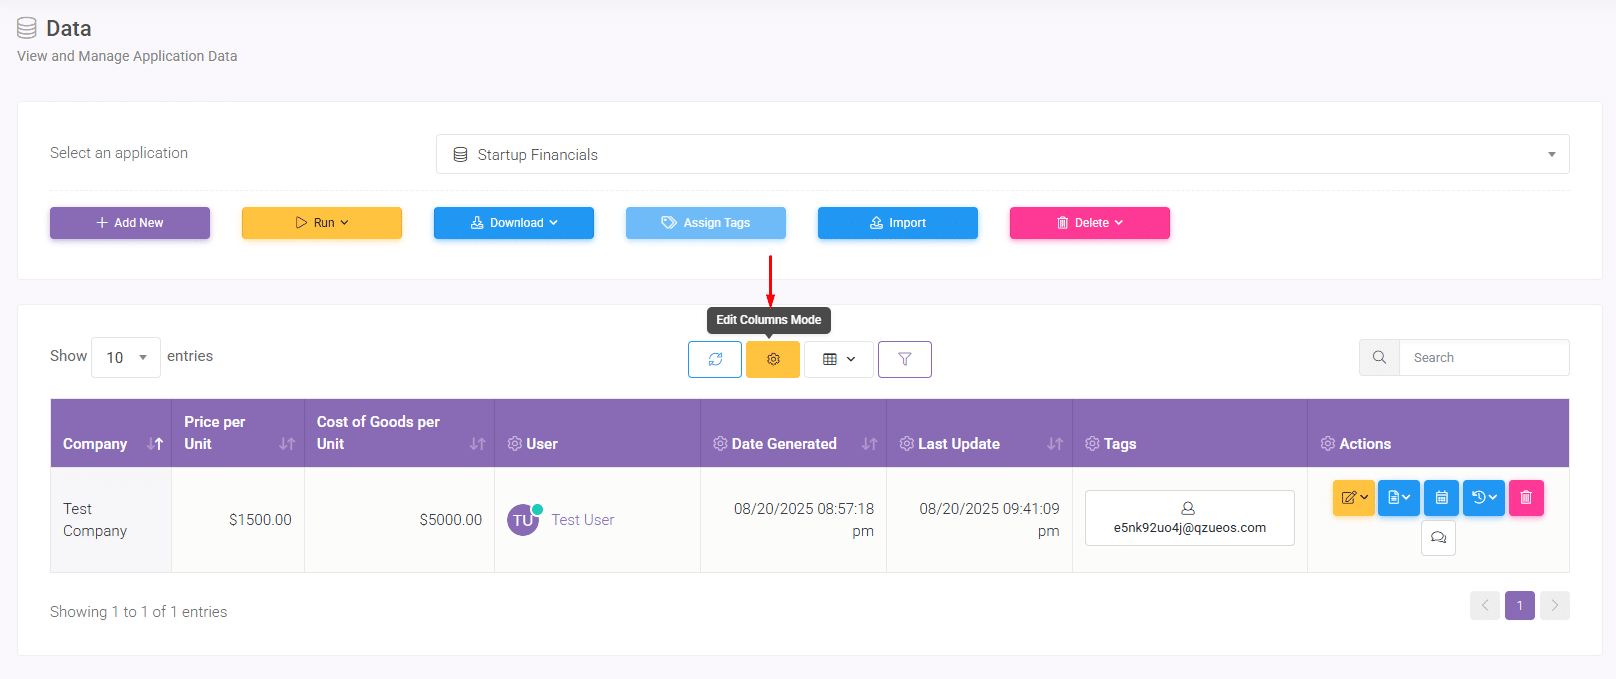
You can configure which fields appear in the Data list based on fields in your application (e.g., Company Name, Address, Country, Status). This helps users quickly find the right entry.
- Click Edit Columns Mode.
- Add the columns/fields that should appear on the Data page, then click Exit Edit Columns Mode.
- Select Save Layout as New, enter a layout name, and click Save.
- Select Apply Layout, add the target users, and click Save.
Result: When users log in to the Hub, their Data page will display the configured columns instead of raw Record IDs—making self-service management much easier.


Summary
To privately share a SpreadsheetWeb application, set the app to Require Authorization, create a User Template (identity template) that defines access and data permissions, invite users with that template, and guide them through registration. If your app stores data, enable Data Access in the template and configure the Data page so users can easily find and manage their records via the Hub—ideally with helpful columns rather than just Record IDs.


