Excel offers users the convenience of horizontal and vertical scroll bars to facilitate smooth navigation within worksheets. These scroll bars are indeed valuable tools for effectively working with your Excel workbook, allowing you to seamlessly traverse vast data sets. However, there are scenarios where you might seek a more refined and compact appearance for your Excel files. The desire to present a polished and uncluttered look in your workbook can be particularly relevant when you wish to draw your users' attention to specific data ranges or when you simply want to enhance the overall aesthetic appeal of your Excel project.
To achieve this, you have the option to hide these scroll bars temporarily, providing a cleaner interface and guiding your users' focus towards the content that matters most. What's more, you can take this customization a step further by integrating it with other Excel parameters using the versatile VBA (Visual Basic for Applications) method. This approach allows you to not only hide or unhide scroll bars but also add dynamic, personalized functionality to your workbook.
In this guide, we'll take you through the detailed steps necessary to effortlessly hide or unhide both horizontal and vertical scroll bars in Excel. You'll explore two distinct methods, each offering unique advantages. Whether you prefer using Excel Options for simplicity or diving into VBA for advanced customization, we've got you covered. Let's embark on this journey to tailor your Excel experience to your exact specifications.
Hide or Unhide Each Excel Scroll Bar Using Excel Options
In Excel, customizing your workbook's appearance is essential for creating a polished and user-friendly experience. One aspect of workbook customization involves managing the display of horizontal and vertical scroll bars. These scroll bars allow users to navigate through large datasets efficiently. However, there may be instances where you wish to hide them to achieve a more streamlined and professional look.
Fortunately, Excel offers a straightforward way to adjust these scroll bar settings through the Excel Options dialog. In this section, we'll walk you through the process step by step, ensuring that your workbook's scroll bars are configured precisely according to your preferences.
1. Accessing Excel Options:
To begin, open your Excel workbook and locate the File tab (for Excel versions 2010 and newer). For Excel 2007 users, look for the Office button instead. Click on the File tab (or Office button in Excel 2007) to proceed.
2. Opening Excel Options:
Once the File tab (or Office button) is selected, you'll see a list of options. Look for and click on 'Options' to open the Excel Options dialog box.
3. Navigating to the Advanced Settings:
Within the Excel Options dialog, you'll find several tabs. Navigate to the 'Advanced' tab by clicking on it.
4. Configuring Display Options for Your Workbook:
Scroll down the list of settings until you reach the 'Display options for this workbook' section.
5. Selecting the Appropriate Workbook:
If you have multiple workbooks open simultaneously, it's crucial to ensure that you're making changes to the correct workbook. Verify that the desired workbook is selected.
6. Show or Hide Scroll Bars:
In this section, you have the choice to either show or hide the horizontal and vertical scroll bars based on your requirements. Simply check or uncheck the 'Show Horizontal Scroll bar' and 'Show Vertical Scroll bar' options to toggle the scroll bar visibility.
7. Applying Your Changes:
After adjusting the scroll bar settings to your liking, click the 'OK' button at the bottom of the Excel Options dialog to apply your changes.
By following these steps, you'll manage the display of scroll bars in Excel, ensuring your workbook presents itself professionally and aligns perfectly with your intended user experience."

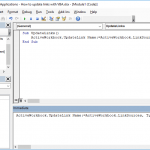
Hide Scroll Bar in Excel with VBA
Excel's Visual Basic for Applications (VBA) provides a powerful solution for users seeking control over the display of scroll bars. Whether you wish to hide or reveal these scroll bars in your Excel workbook with a single click or automate the process to maintain a consistent layout, VBA offers the flexibility you need.
Each scroll bar in Excel corresponds to a specific property under the Window object. By manipulating these properties, you can easily control the visibility of the horizontal and vertical scroll bars. Here's how it works:
1. Hiding Horizontal Scroll Bar:
To conceal the horizontal scroll bar, you'll set the DisplayHorizontalScrollBar property to False. This action effectively hides the horizontal scroll bar, providing a cleaner appearance to your workbook. Utilize the following VBA code snippet:
ActiveWindow.DisplayHorizontalScrollBar = False
2. Revealing Horizontal Scroll Bar:
If you wish to unhide the horizontal scroll bar and make it visible again, simply set the DisplayHorizontalScrollBar property to True. This action restores the horizontal scroll bar's presence. Employ the following VBA code snippet:
ActiveWindow.DisplayHorizontalScrollBar = True
3. Hiding Vertical Scroll Bar:
Concealing the vertical scroll bar follows a similar principle. You'll set the DisplayVerticalScrollBar property to False, effectively hiding the vertical scroll bar. Use the following VBA code snippet to achieve this:
ActiveWindow.DisplayVerticalScrollBar = False
4. Revealing Vertical Scroll Bar:
To unhide the vertical scroll bar and make it visible once more, set the DisplayVerticalScrollBar property to True. This action brings back the vertical scroll bar's functionality. Employ the following VBA code snippet:
ActiveWindow.DisplayVerticalScrollBar = True
By leveraging these VBA code snippets, you gain precise control over the visibility of Excel's scroll bars. This capability allows you to tailor your workbook's appearance and layout to your exact specifications, enhancing the overall user experience."