Leveraging a no code platform with a dynamic structure can revolutionize your web application's user interface (UI), simplifying the data entry process and optimizing user time utilization. Within SpreadsheetWEB's designer applications, numerous controls can be seamlessly hidden or disabled based on outcomes derived from another named range in your workbook. This unparalleled functionality empowers you to establish diverse logical conditions, linking controls, specific sections, or entire pages to designated fields for precise control over user access.
The key to this interactive field manipulation lies in using Boolean fields, integral components easily created without code. A Boolean field, representing a cell with a TRUE or FALSE outcome, can be generated effortlessly using IF statements or direct input of "TRUE" or "FALSE" into a cell. These Boolean fields serve as the foundation for setting up calculation logic, and you can effortlessly associate controls with them to dynamically hide or disable elements based on your defined conditions.
The "By Value Of" option, a cornerstone of this feature, becomes accessible when working with Boolean fields. This parameter, crucial for conditional control, only becomes visible if your workbook incorporates at least one Boolean field. To illustrate this innovative approach, let's explore a straightforward sales application with two distinct pages – input and output sections. The List Sheet and Rate Tables, exclusively utilized for calculations, remain discreetly hidden from the user interface (UI) to ensure a streamlined and efficient user experience. Embrace the power of no-code platforms to elevate your web application's functionality and enhance user interaction seamlessly.

Controls in SpreadsheetWeb's No Code Platform
Within no code platforms and user interfaces for designer applications, seamless control management is achieved by associating each input or output control with a toggle function for either hiding or disabling. This is effortlessly accomplished by linking these controls to a Boolean named range. Consider a scenario where, using a no-code platform, we aim to streamline the user interface by concealing the dropdown option for business property deductible (Deductible-BP). This action is conditionally triggered based on a threshold, specifically, the business property insurance amount (Bus. Prop. – Amount of Ins.) falling below a defined level. This approach ensures an intuitive and dynamic user experience without the need for intricate coding, showcasing the versatility and efficiency of no-code platforms in UI design.

Utilizing the no-code platform, the named range "BusPropAssess" employs an IF statement to yield a TRUE result when the input for "Bus. Prop. – Amount of Ins." surpasses $50,000 and FALSE otherwise. To seamlessly disable the deductible option, navigate to the UI designer, choose the "Deductible-BP" field, and access the Enabled menu. Opt for "By Value Of" and direct the pointer toward the associated Boolean field, facilitating an intuitive and code-free process.

The disabled input will be grayed out until the perquisites are met.

Sections for UI Design
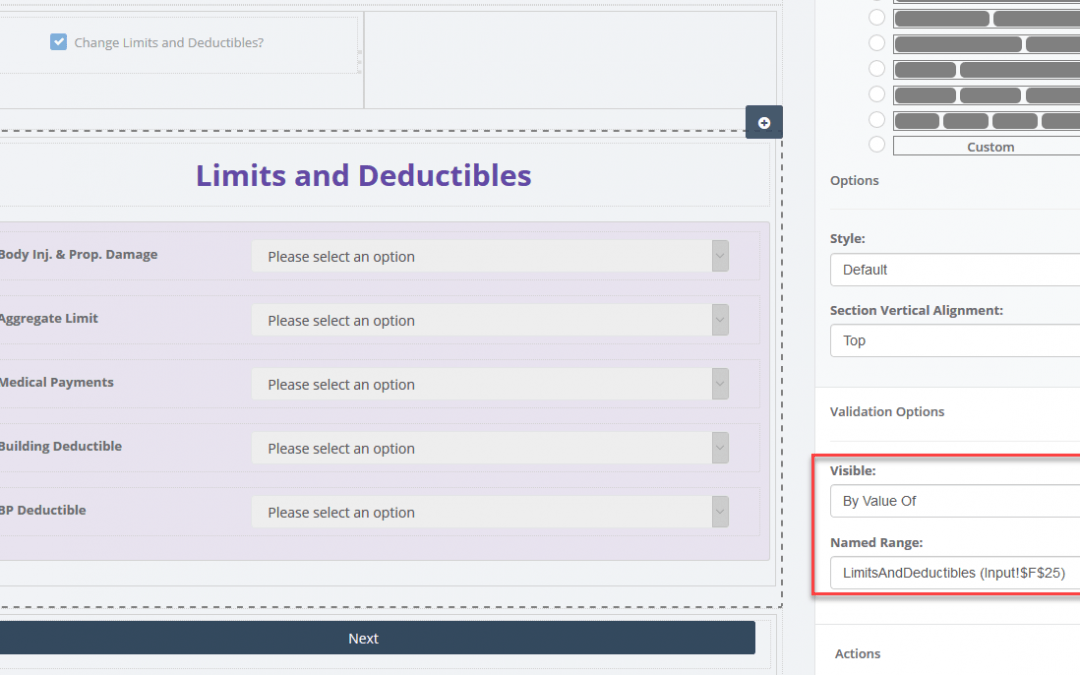
Sections define individual “rows” in the user interface. A “Limits and Deductibles” section is on the bottom of our application. The calculation logic will use the “default” values if no selections are made for these inputs, and let’s say we want to hide these fields to prevent cluttering. This will give our users fewer inputs to worry about and improve overall performance. We will add a checkbox type of input on the bottom of the page, before the “Limits and Deductibles” section to hide this field if the user wants to use the default values.
To do this, we’re going to begin by adding a Boolean single named range in the workbook. This will be our checkmark for toggling the section.

Now, we need to create a checkbox type of input above this section and select the “LimitsAndDeductibles” Boolean named range.

Next, we need to point the “Limits and Deductibles” section to the Boolean field, by clicking it and then choosing By Value Of from the Visible dropdown. This will give us a second parameter where we can select the Boolean named range from the Named Range field.

The user interface will now hide the “Limits and Deductibles” section, unless the user enables the checkbox next to the “Change Limits and Deductibles?” question.

Pages
A progressive navigation structure can prove useful for making sure that your users finish on a page before moving onto the next one. You can disable any pages in your application depending on the outcome of a Boolean named range.
Our sample application consists of two pages – Input and Output. Let’s try creating a navigation logic where the users won’t be allowed to go to the output page unless they enter a building insurance value of $200,000 or higher. The named range “BldgAssess” in our workbook contains an IF statement that looks at the value entered for this field.

To create this relationship, we need to go to the Page Designer and select Output in the designer interface.

Here, we enabled the Enabled Toggle option and selected the corresponding named range for the enabled by value of field.

The Output page will be disabled until a value greater than $200,000 is entered for the Building Value input.

Also, check out our related video below or click here to learn more about no code.