The Quick Access Toolbar in Excel is a part of the program's interface and offers a convenient way to access frequently used commands. This customizable toolbar, typically located above the Excel ribbon, streamlines your workflow by keeping essential tools at your fingertips. In this guide, we delve into a specific function of the Quick Access Toolbar – displaying and copying the location of your active workbook. This feature is particularly useful when you need to quickly ascertain or share the file path of your current Excel document.
Edit the Quick Access Toolbar
To customize the Quick Access Toolbar in Excel, which significantly enhances your efficiency in navigating and utilizing various Excel features, you need to access its settings. These settings are conveniently located within the Excel Options window, alongside the ribbon settings. Look for the small arrow symbol, often termed the Toolbar arrow, located near the top of your Excel window. From the dropdown options, select 'More Commands'. This action will open a window where you can modify and personalize the Quick Access Toolbar to suit your specific workflow needs in Excel.

To efficiently customize the Quick Access Toolbar in Excel, simply right-click on the Toolbar directly. Select 'Customize Quick Access Toolbar' from the context menu that appears.

Now, activate the File tab in the ribbon and open Options > Quick Access Toolbar.

Add Document Location
To add the 'Document Location' command to the Toolbar in Excel, follow these steps:
- Open the Quick Access Toolbar customization window, where you'll find two key sections: The left section lists available commands that you can add to the toolbar. The right section displays the commands currently included in your Quick Access Toolbar.
- In the customization window, start by selecting 'Commands Not in the Ribbon' from the 'Choose commands from' dropdown menu. This option allows you to access a broader range of commands that are not typically found in the Excel ribbon.
- Scroll through the list of commands in the left section until you find 'Document Location'.
- Once you locate 'Document Location', click on it to highlight, and then select the 'Add' button. This action will move the 'Document Location' command to the list on the right, indicating that it has been added.
- After you see 'Document Location' in the right-hand list, confirming its addition, click the 'OK' button. This will apply and save your new settings.
By completing these steps, the 'Document Location' command will be readily accessible in your Toolbar, streamlining the process of viewing and copying the file path of your active workbook in Excel.

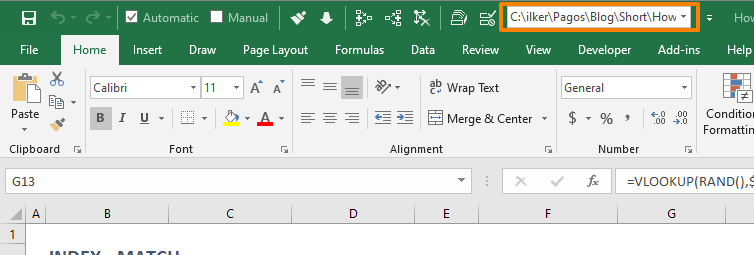
Once you click 'OK' after adding the 'Document Location' command to the Quick Access Toolbar in Excel, you'll notice a new feature: a textbox control will appear in the Quick Access Toolbar. This textbox displays the file location of the currently active workbook.

Copying the File Location: You can easily highlight the text showing the file location in the textbox. This allows you to copy it as text, which can be useful for referencing, sharing, or saving the file path for later use.
Opening Another Excel File: Additionally, this feature provides a convenient shortcut to open other Excel files. If you have or have copied the file location of another Excel document, you can simply paste that file path into the 'Document Location' textbox. After pasting, press the Enter key, and Excel will open the file corresponding to the pasted file path.